Wednesday, May 22, 2013

Chef Matt's Pecan Crusted Fish & Strawberry Vinaigerette Spinach Salad - Video

It's a family affair, in the latest 99 Cent Chef recipe video. My nephew, Chef Matt, has a great fish and salad recipe for you.

Uncle Tightwad sticks his toe back in the swamplands for his latest culinary tale. And I'm as pleased as Mom's Pecan Pie to bring you this tasty recipe from Cajun Chef Matt: a Pecan Crusted Fish & Spinach Salad with a Strawberry Vinaigerette.


This is a country club expense account recipe where Chef Matt cooks, rattling copper-coated pots and laying out real silverware. While his entree is on the fine-dining end of the scale, anyone can easily afford to do it now that The 99 Cent Chef has run the recipe through this chintzy food blog.


I get my small fish fillets from the frozen discount case in local markets and 99c only Stores. As I've mentioned before, unless you catch it yourself (or are lucky enough to personally know who hooked them) most fish are put on ice and refrigerated when caught, so don't feel you are getting an inferior fillet, just because it's frozen.

This recipe works best with firm fish like rockfish, tilapia, catfish, salmon, and swordfish. If you have a local catch you like then by all means use it.


Pecans are harder to come by, but every time I go back to visit Mom in Louisiana she always locally shelled, and frozen pecan meat in the refrigerator. You can use any cheaper local dried nut that is special to your area. Here in Los Angeles, I can get small $1 packages of nuts from my local 99c only Store, including cashews, almonds, pistachios, and peanuts. You could even use a cheap small package of nuts from the corner liquor store. Just be sure to wash off the salt and pat dry the nuts.


For the vegan Spinach Salad, a sweet Strawberry Vinaigrette is the star. Strawberries in season are certainly cheap enough and pre-washed packages of spinach are too. If it's cheaper, then use any favorite greens you have locally.


The preparation is simple and straightforward. Just soften some strawberries with a small amount of vinegar and water over medium heat and blend it all with some olive oil, for a tasty Strawberry Vinaigrette. I have the feeling you will come back to make Chef Matt's Strawberry Vinaigrette recipe many times and add it to all manner of salads you come up with.


As for the Pecan Crusted Fish, it's simple to do. Just crush some peeled pecans (or favorite nuts) in a blender or use Chef Matt's outrageous beer bottle method! Mix in a little flour and coat the fish for a quick saute. Assemble the salad with strawberry dressing and add the fish, that's it.


So watch my video below and try out Chef Matt's Pecan Crusted Fish & Spinach Salad with a Strawberry Vinaigrette -- and impress your date,  family, or friends.

Pecan Crusted Fish & Spinach Salad with a Strawberry Vinaigrette  - VIDEO
Play it here, the video runs 8 minutes, 3 seconds.

My YouTube video link for viewing or embedding, just click here.

Ingredients for Pecan Crusted Fish (serves 2-4)
  • 2-4 Fish Fillets - best to use a firm fish, like catfish, salmon, halibut, swordfish, bass, cod, or almost any local catch. Chef Matt coated one side only, but you could do both for extra coating.
  • 1 cup Pecans -roughly chopped and crushed to the size of bread crumbs.
  • 1/4 cup Flour
  • 1 tablespoon Oil per fillet - as needed for sauteing fish.
  • 1 teaspoon Butter per fillet - optional. For a lighter meal, okay to leave it out.
  • Salt and pepper to taste.


Spinach Salad with Strawberry Vinaigrette Ingredients (serves 2-4)
  • 5 large Strawberries - quartered or roughly chopped.
  • 1/4 Vinegar - any type, Chef Matt used red wine vinegar.
  • 1/4 Water
  • 1 cup of Olive Oil - It's okay to use half the amount for a lighter vinaigrette.
  • 1/2 teaspoon Sugar - or favorite sweetener
  • 1 bunch of Spinach or favorite greens - clean spinach if necessary. Set greens aside until fish is cooked.


Directions for Strawberry Vinaigrette
Remove green tops from strawberries. Quarter or roughly chop them. 

Add to a pot along with 1/4 cup each of water and vinegar, and 1/2 a teaspoon of sugar. Low boil over medium heat until strawberries are soft, about 3-5 minutes.


You can let the strawberry mixture cool down for a couple of minutes, then add to the blender. Pulse blend until smooth. 

Now bring it all together by slowly adding a cup of olive oil while blending. This will emulsify and create a thick soup-like salad dressing. For a lighter vinaigrette, it's okay to use half the amount of oil. Set aside in the refrigerator until ready to serve.


Directions for Pecan Crusted Fish
Crush 1 cup of pecans. You can easily place pecans in a plastic bag and use a hammer, rolling pin, or like Chef Matt, the bottom of an empty (beer) bottle. Okay to use a food processor or blender, just be careful not to pulverize pecans into powder. Pieces should be similar to bread crumbs when done.


Add a 1/4 cup of flour to crushed pecans. Mix well. 

If fish fillets are too dry, do a quick rinse with water to moisten them, so the pecan mix will stick to fillets. Sprinkle with salt and pepper to taste. 

Press the fish fillet onto a plate of pecan coating. Add fillet to hot pan -- okay to add a few fillets to fill the pan. Chef Matt just coated one side of the fish, but you could do both, for extra flavor.


Add a tablespoon of oil to a frying pan over medium to medium/high heat. When oil is hot place the fillet with the pecan-coated side onto the hot pan -- okay to add a few fillets to fill the pan. Chef Matt just coated one side of the fish, but you could do both, for extra pecan flavor.


Allow the pecan-coated fish to saute for a minute before moving the fillet -- this allows time for the coating to stick to the fillet and not the pan. After a minute check to see that the pecans are nicely browned, then flip the fillet and cook on the other side for another minute or two. 

Add a pat of butter for a luscious finish -- this is optional of course if you want to keep it lighter. And watch the video to see how Chef Matt deglazes the pan and bastes the fish in its own buttery juices.


Cooking time will vary depending on how thick the fish fillet is, or how well done you like your fish. Better to finish cooking on the uncoated side, so you don't loosen pecans from the fish. But if a few pecan pieces come off during cooking, it's okay to set them aside, and then put them back on when plating the fish.

While the fish is cooking, time to finish the Spinach Salad with Strawberry Vinaigrette. Over the cleaned and washed spinach, drizzle on the cooled Strawberry Vinaigrette. Add as much as you like, about 2 tablespoons per salad. Mix well.


When Pecan Crusted Fish is done, place it on the Spinach Salad. Drizzle on some of the Strawberry Vinaigrette and chow down! It's also okay to leave off vinaigrette and serve fish with pecan coating only -- it's a little extra crunchy that way.

You could also just place the cooked fish on the plate and serve the salad on the side.

Thursday, May 16, 2013

Pasilla Chile, Potato & Cheese Frittata

Like an open faced or unfolded omelet, an Italian Frittata is a versatile dish to serve any time of day. It's perfect for two but my chintzy recipe is easily expanded to feed the whole family. And you can make the recipe your own to feed any finicky eater.


I've made a Frittata photo story recipe before, just click here to see it. It was a vegetable crisper-emptying meal. For my latest version it has a Latin twist with the addition of Pasilla Chiles from my local Mexican market. But as I mentioned, this recipe is easily adaptable to use any local low-spicy chile you have on hand (or from the can.) Almost any thin-sliced or leafy veggie can also be used, like: squash, bell pepper, green beans, corn, cauliflower, broccoli, kale and spinach.

Latin markets often list a Poblano Chile as a Pasilla (which is actually the dried version name,) but both are the same. A Pasilla (or Poblano) Chile is much milder than a spicy jalapeno. I find that they are even milder when cooked and take on a much deeper pepper flavor. They are about the same size as a bell pepper, but slightly longer with a darker green hue. Pasilla Chiles cost about the same too. They also stuff nicely like a bell pepper, and I have a delish recipe that you should check out, by clicking here.


As for a Frittata, it's prepared almost like an omelet, you just don't fold it, and you finish it topped with melting cheese in the oven -- like an omelet pizza! For more heft I also added some sliced potatoes. You can make it to serve two or ten; as a light breakfast or a full on brunch. Just add more eggs, chiles, potatoes and cheese to a bigger oven-proof pan, that's all. To get more detailed directions for a Frittata that feeds a party of 10, go to the end of the post and read my Hindsight section.

Try out my Italian Frittata with a Latin twist -- it's a one pan dish. But be sure to make plenty, as seconds will surely be requested.


Ingredients (2-3 servings)
  • 5-6 eggs
  • 2-3 Pasilla Chiles (or Poblano Chiles) - Anaheim chiles are a local tasty mild chile, too.
  • 1 medium potato - I used russet, but you can use red or white potatoes. Enough to fill the bottom of your omelet pan.
  • 2 tablespoons of milk - optional. For mixing into eggs.
  • Cheese - enough to cover the Frittata. Any type you like. I used about a half cup of Mozzarella (use more or less to your liking.)
  • Tablespoon of oil - to fry potatoes.
  • Salt and pepper to taste.

Directions
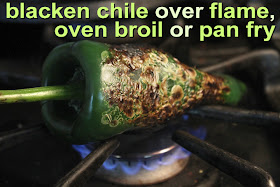
First char Pastilla Chiles over an open gas flame. Use a pair of tongs to turn them every 10 seconds or so. They should blacken on all sides. As each chile is done, add to a bowl and cover with a plate so they continue to cook and steam - this will make the blackened skin easier to remove. You don't have to remove all the skin, it's just about cooking the chiles to soften them.


For an electrical range just broil or bake them in the oven. Watch closely and turn when each side darkens and blisters. You could also just saute them whole in a pan until they soften and lightly char. The idea is to cook them until soft, and you don't have to remove all the skin.

Once the chiles are blackened keep covered (I use a plate) for about 2 minutes. (You can go to the potato sauteing part now.) The chiles will continue to steam when covered and this will make it easier to rub off the charred skin.


Slice potatoes into 1/4 inch thick rounds. (Okay to slice or chop the potatoes any way you like.) Over a medium heat, add oil to an ovenproof pan (about 6-8 inches wide.) When oil is hot add potatoes. Allow them to cook about 5 minutes each side until tender and browned.


Best not to move the potatoes around when you first put them in the pan as they will stick and crumble apart at first; just let them set 2 - 3 minutes then loosen, check until brown.

As the potatoes cook, fill up a bowl with water and rub off the blackened skin. Finally rinse off the chiles to remove the last bits of char -- don't worry about removing every last bit, hey it's just extra flavor. If you bake or saute chiles, there will  be less char to remove.


The last step for the cooked chiles is to remove the stem and seeds. Just slice lengthwise into each chile and slice off the stem top. Remove the seeds - they should just slide off the skin. Finally slice or dice the chiles. I like large pieces or strips.(The chiles have very a little heat, but still don't rub your eyes or they will burn, and wash your hands with soap after handling them, just in case -- you could also use rubber gloves when cleaning chiles.)

Add eggs to a bowl and some milk (optional). Whisk and blend together for a minute. Once both sides of potatoes are browned (and not stuck to the bottom) slowly pour in the blended eggs. Add the tender Pastilla strips on the eggs and potato mixture. Salt and pepper to taste.


Turn heat to medium/low and allow to cook without stirring. After about 3-5 minutes eggs will start to solidify along the edges of the pan. Cook until eggs are solid about an inch inward from the edges of the pan, but still watery in the middle. It's time to finish up by adding the cheese.


Turn off the stove heat and turn on the oven broiler. Top Frittata with cheese and add to the oven. I don't put the pan right up against the heating element because the Frittata may burn too easily, best to have it a at least 6 inches away from flame or heating coil for better control.


You will want to check every minute, so the cheese doesn't burn. You are looking for a light browning -- my version, in the photo gif above the ingredients, looks good but it got too brown and the cheese was not gooey enough. So next time I would remove the Frittata at the first sign of browning. It should only take a few minutes total. You will get better at timing with practice.


When the Pastilla Chile , Potato and Cheese Frittata is lightly browned carefully remove the hot pan from the oven. You can cut into the middle of the Fritatta to make sure the eggs are cooked through -- if not then return to the oven for a couple more minutes (regular 350 degree heat, no need for the broiler.)

Take a knife and slice along the outside edge of pan to release the Frittata. You should be then be able to get a spatula under it to loosen and make it easy to serve.

*For a cheesy version spread on a handful of shredded cheese during the last minute of broiling or last 3 minutes of baking.

Hindsight
Poblano chiles are about 4 inches long, much larger than typical spicy chiles. Pastillas (poblanos) are very mild -- actually not spicy at all to me. I charred the chiles over a gas flame but it's easy enough to just bake them in a pan for about 30 minutes at 375 degrees, until they soften. Or just saute them in a pan on the stove top over medium heat until soft, about 5 minutes each side.

Once the cheese is added you can bake (375 degrees) or broil the Frittata. Watch closely, once it first starts to lightly brown, it's ready. Remove and ready to serve.

This recipe is easy to expand. Add any favorite veggie, depending how you like them, cooked or raw. Also, cooked sausage, ham and bacon are easy protein additions.


 I had a brunch and made a huge Pasilla Chile, Chorize Sausage, Potato and Cheese Frittata, inviting 10 of my friends and neighbors over. So the day before, I pulled out my largest frying pan and fried up enough potatoes to cover the bottom. Then blackened about 8 Pasilla Chiles. I washed off the chiles and sliced and removed the seeds. I put the browned potatoes and sliced cooked chiles in containers until the next morning.


A hour before the guests arrived, I started heating up the sliced Chorizo (I used a dry-aged type, similar to pepperoni sausage,) and added the potatoes in my large ovenproof frying pan (it's 11 inches across and 2 inches deep.) I cracked and separated 2 dozen eggs into a large bowl. Next I added a 1/4 cup of milk to the eggs and whisked it all together.


Once the potatoes were reheated, I added the egg mixture and topping of pre-cooked sliced Pasilla Chiles. I cooked the eggs until they were solid about a couple of inches in from the outer edge. (It takes twice as long to cook since the pan is larger.) When almost done (while the eggs are still runny in the middle of the Frittata,) I turned off the heat and added a lot of cheese (at least a cup.)

Finally, I turned on the broiler and cooked the Frittata until the cheese was melted and just starting to brown, about 5 minutes (depending how close the oven-proof frying pan was to the flame or heating coil.) Be sure to check every minute, to make sure the Frittata doesn't burn.


You can also just bake it slower at 375 degrees, about 20 to 30 minutes. It will take longer, but this is a safer way to go. Just check that the eggs are not runny in the middle before serving. And add the cheese during the last 5 to 10 minutes, so the cheese stays moist.

The Pasilla, Potato and Cheese Frittata was a big hit and got a lot of compliments -- I hope your version gets the same reaction!

Saturday, May 11, 2013

BLT + A - Deal of the Day Sandwich

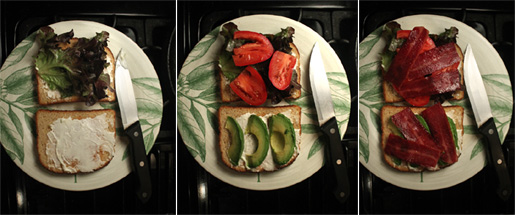
This classic sandwich is given, a 99 Cent Chef twist with the additions of low-cal Turkey Bacon and luscious avocado. My BLT + A, made with warm toasty bread, bacon, tender tomato, creamy avocado and crisp lettuce, has all the textures that make up a great bite.


My new favorite local Latin grocery chain store, Superior Grocers, has been selling 4 large avocados for a dollar the last 2 weeks. So I've been adding creamy slices to salads and every type of sandwich I make.


I would normally use real bacon for a BLT sandwich, but seeing Turkey Bacon on sale at my local 99c only Store, I wanted to finally try some.This is the type of special Deal of the Day that is snatched up quickly. So when you see something like this, you have to just buy it and figure out later how to use it -- because by the time you come back, after wandering the asiles, it may be gone! Believe me, this has happened many times and forget about coming back the next day, it will definitely have sold out.


You are getting a 2-fer today: a Deal of the Day review of Turkey Bacon and this delish recipe!

Now right off the bat, it does not compare with real bacon, but it's not bad. I guess the best thing you can say about Turkey Bacon is that it's low calorie.  There is a smokey flavor similar to cured bacon. It has the texture of baloney, but manages to crisp up fine. Although it doesn't scrunch up, or crunch and shatter like well-done real bacon. And Turkey Bacon shrinks very little, so you don't need to cook as much. For a lighter breakfast I would cook with turkey bacon again. So on a scale of 1 to 9, 9 being best, I give this Deal of the Day a 6. (Anything I rate a 5, or higher, is worth a try.)

If your sandwiches are boring lately, then try out my cheap and satisfying  
BLT + A -- and make sure to load up the sandwich with thick slices of creamy avocado!


Ingredients
  • 3-4 slices of bacon - I used turkey bacon on sale, but you could also use regular bacon.
  • 2 slices of bread - toasted. I used wheat bread.
  • Tomato - as many slices as you like for a sandwich.
  • Lettuce - as much as you like for a sandwich.
  • Avocado - as much as you like for a sandwich.
  • Mayo and/or mustard - I used mayo only.
  • 1 teaspoon oil - for turkey bacon. You will not need oil for regular bacon.


Directions
Saute bacon over a medium heat. For turkey bacon you may need a teaspoon of oil when frying. For regular bacon no oil is needed, but you may want to drain bacon when done.


Start bread slices toasting. (I used whole wheat bread purchased from the 99c only Store.) Slice tomato and avocado into desired thickness. Tear lettuce leaves into smaller pieces to fit sandwich.


Add mayo and/or mustard, and assemble the BLT + A sandwich.

Monday, May 6, 2013

Lola's First Bite Video - Eating Artichoke, Taco & Pomegranate Seeds

Who's feeding who? That's the question you will ask after viewing The 99 Cent Chef's latest video of Lola's First Bite. Lola is starting to take more control of the dining situation -- just watch the video at the end of this post to see what I'm talking about.


And as usual I've hand-picked quite an eclectic selection of West Coast delectables to tantalize the taste buds of  this newbie nosher, including: Steamed Artichoke, a Homemade Carnitas Taco, and juicy, colorful Pomegranate Seeds.


At almost 3 years old (when this video was shot) little Lola is on the way to being the cutest cherub gourmand around. It was a sunny morning when I invited Lori, Bob and Lola over for a homemade Carnitas Tacos and Mimosa Sunday Brunch. I also had an Artichoke steaming and had my fingers stained red, seeding a messy Pomegranate. It was all coming together for more culinary hijinks on another Lola's First Bite!

First up was a Steamed Artichoke (click here to see my clever stop motion animated video recipe.) I selected the tenderest leaves and separated and cleaned the luscious Artichoke Heart. I also made a sweet Mayonnaise Dip (with just a sprinkle of sugar in the mayo) to help it go down easier, because I knew it would be a tough sell for this tot's fast developing and discerning palate.


I've learned by now to first start with what is the most questionable eatable. Lola liked the Mayo Dip better than the Cultivated Thistle. She is game to try almost anything, or at least give it a single bite. Let's just say she gave it a go, and fortunately her Mom was there to catch the masticated heart.

 
If you live in or are visiting Los Angeles then you will sample real Mexican cuisine. And Lola's second bite was a succulent Carnitas Taco homemade cheaply by yours truly. (And be sure to click here for my recipe video and throw your own Taco Brunch!)


My recipe is delicious enough to please carnivores from two and three quarters years old to eighty. Don't take my word for it, just watch Lola make past tense of it in no time. Now if only she can learn how to fold a tortilla!


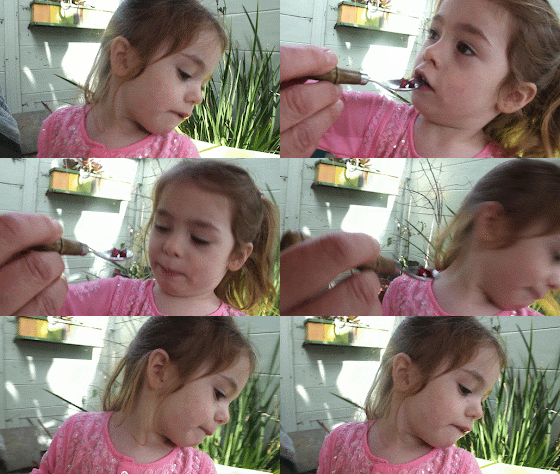
And the last First Bite is what I thought would go down the easiest, sweet and plump Pomegranate Seeds. Well, Lola turned the tables and had everyone literally eating from the palm of her tiny hand.


Pomegranate Seeds have a mildly sweet and tart citrus flavor. While not as inviting as a plump strawberry, I figured the bright color would entice Lola, but looks are deceiving.


Well, I've learned to roll with the situation and managed to get a great back-and-forth between Lola's parents, Bob and Lori, using every trick in the book to get her to try them. I'm sure every baby sitter of a toddler will  recognize Lola's intransigent mealtime antics.

 My latest Lola's First Bite video is fun and entertaining. So play it below, smiles are guaranteed! And for all my visitors who are Moms, Happy Mother's Day -- this video is dedicated to you!
Lola's First Bite - VIDEO
Play it here, video runs 4 minutes, 8 seconds. 

To view or embed from YouTube, click here

And if you can't get enough adorableness, I have 4
ola's First Bite videos (just click on a title): Lola's First Bite 1.0, Lola's First Bite 2.0Lola's First Birthday Party, and Lola's First Bite 4.0.

 99 thanks to Bob, Lori & Lola.

Wednesday, May 1, 2013

Pasta Salad - Peas, Artichoke Hearts, Broccoli & Wheat Pasta

After the last two months of chowing down on every kind of meaty taco there is, as well as fried chicken, it's time to air out the arteries. If you have been with me throughout my Taco Month and a Cheap$kate Fried Chicken Challenge between the Ludo Truck and KFC's Chicken Littles, you are probably as ready as I am for some simple carbs and veggies. And I have the perfect vegetarian entree: Pasta Salad with Peas, Artichoke Heats and Broccoli.

Made deli-style, I use oil and vinegar for tartness and lusciousness. I quick parboil some crunchy veggies for texture, and added green peas and marinated artichoke hearts, to healthy wheat pasta.

This recipe is easy to make your own. Whatever crunchy fresh veggie on sale can be added, including: cauliflower, zucinni, Italian squash, bell pepper, green beans, corn and carrots. You can use them uncooked, or blanched for a minute.


I'm always on the lookout for marinated veggies on sale at my local 99c only Stores. I've found asparagus, roasted peppers, heart of palm, black olives and artichoke hearts. If they are stored in salted water then drain them. If it's a marinade, taste it and if you like it, then pour over the cooked pasta.


 The 99 Cent Chef's Pasta Salad with Peas, Artichoke Heats and Broccoli is a good recipe to start with -- and when you have it figured out, make the recipe your own and add any favorite seasonal veggies you find on sale from your local farmers market or grocery store.


Ingredients (4-6 servings)
  • 1 package tube, spiral or bow tie pasta - about 12 to 16 ounces (1 pound). Almost any type of pasta, really. I used wheat, but you can use regular macaroni or gluten free pasta as well.
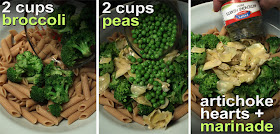
  • 3 - 4 cups of chopped veggies - Again you can use any type you have on hand, frozen (any combo blend) or fresh, including: carrots, bell pepper, cauliflower, zucchini, corn and green beans. I used 1 cup frozen peas and 3 cups of fresh broccoli.
  • 1 to 2 jars of marinated artichoke hearts - I used one 6 ounce jar. You can use any type you like. Drain if artichokes are in water. If in a marinade then add it all to the pasta salad -- extra flavor!
  • Other canned or jarred veggies to include or substitute: black olives, asparagus, roasted bell peppers, beans, etc. Whatever you find on sale, just store it until ready to use in a Pasta Salad.
  • 1/4 cup of olive oil - or any flavorful oil. Okay to use less for a lighter salad.
  • 1/4 cup of vinegar - I used white, but you can use apple, red wine or rice vinegar. Since vinegar is such a strong flavor that I add it last, about a couple of tablespoons at a time to desired tartness.
  • 1 teaspoon chopped garlic - optional
  • 1 tablespoon of chopped herbs - including any combination of parsley, basil, oregano or sage. Okay to use a teaspoon of dried herbs.
  • Salt and pepper to taste - should not need too much salt if you use canned black olives, or any pickled veggies.
Directions
Start a large pot of water boiling (see pasta package directions.) Roughly chop veggies: for broccoli I just broke off florets, peeled and chopped the stem (same if using cauliflower.) For carrots, zucchini or bell peppers, roughly slice or chop. Add these crunchy veggies to boiling pasta water for about a minute. You just want to slightly soften them. Of course, if you like your veggies raw, that's okay too -- no need to cook them all.

Allow frozen pre-cooked peas to defrost. You can use canned peas, although they are mushier, but do drain them.

With a slotted spoon or strainer, remove the veggies from water and set aside. (Okay to just steam the veggies, or use a defrosted frozen veggie blend.)

Add pasta to boiling veggie water. (No sense throwing out that flavorful veggie broth, right?) Cook according to directions. I usually shave off a minute or two for al dente.


When pasta is done, drain and rinse with water to stop cooking.


Now time to put it all together. Add drained pasta to a large bowl. Mix in cooked, raw and marinated veggies. Add marinate from jarred veggies, too. Sprinkle in a tablespoon favorite chopped herbs, or a teaspoon of dried Italian-style herbs.


Drizzle on 1/4 cup each of oil and vinegar. Okay to use less oil for a lighter Pasta Salad. Salt and pepper to taste.


Mix it all together well. Liquid marinade will sink to the bottom so be sure to coat pasta and veggies well.

Allow Pasta Salad to sit for about an hour to reach full flavor. You can chill it or serve at room temperature. Store in refrigerator if serving later or the next day.


Hindsight
I've had may types of pasta salad. The common flavoring is oil and vinegar. You can adjust the veggie-to-pasta balance to suit your taste -- heavier on the vegetables if you like.

You can also add spinach, but I would only add it at the last minute, as it will discolor and wilt if sitting too long in the acidic marinade.

My Pasta Salad also heats up nicely in the microwave oven. And for more protein try adding a favorite sliced cooked sausage, a can of drained tuna, or some roasted chicken from your local grocery chain store.