Monday, September 30, 2013

The 15 inch Egg Roll - Deal of the Day

Well, seeing is believing and here it is, a 15 inch Vegetable & Shrimp Egg Roll for 99 cents. Actually, when you line up this package of 3 Egg Rolls end-to-end they total 15 fried inches of Chinese appetizer.


And this Deal of the Day is not bad. I've been curious about these Egg Rolls I've seen in the frozen food section of my local 99c only Stores since forever it seems -- they often stock them. Frozen fried food is not on the top of my noshing list, but I finally had to take the plunge and try it out.


There are no package directions on how to prepare them. Ideally you would heat them up in the oven to get a crisp skin, but I hate to waste so much fuel; so I just microwaved them a minute and a half, then finished them up on a stove top grill for another 5 minutes -- rotating each Egg Roll to get an even crispness. This technique is the fasted way to get a crunchy wonton shell with a steaming hot center. I also set out a small bowl of soy sauce for dipping.


The fried outer dough tastes like your typical Chinese appetizer fare. The ingredient list is long but basically you get plenty of steamed cabbage, carrot and green onion, with a few bay shrimp. Actually the bay shrimp are so small they should be called "inflatable pool shrimp." But I didn't expect much seafood for 99 cents.

The filling was moist, slightly sweet, and the veggies were shredded and substantial; that is were you get your money's worth. The carrot and cabbage even had a little crunch. Also on the ingredient list was mozzerella cheese and cheese curds! Not much but you hit little pockets of the stuff, so there is an overall creamy texture.


As a convenient way to get Chinese takeout on the cheap this is one way to go. So on The 99 Cent Chef's Deal of the Day rating scale of 1 to 9, 9 being best, I give this 3 pack of  Vegetable & Shrimp Eggs Rolls a 6. You could probably even get away with serving them at a party.


Tuesday, September 24, 2013

Salami & Spaghetti

There are more uses for salami than on a pizza or in an Italian sub sandwich. Just saute a few slices with onion and garlic, mix in cooked spaghetti and you have a tasty Italian entree.


In The 99 Cent Chef's latest recipe, this cheapest of deli meat is put to delicious use in a quick and easy Italian pasta dish. You can use any inexpensive sausage you find, even pepperoni. The sausage can come in thick or thin links, or your local deli may have it ready to order and you just ask for any amount -- sliced how you like it.


I get my thinly sliced Genoa Salami from my local 99c only Store. The packages are only 3.5 ounces each, but this is enough for a couple of servings of my cheap$kate Salami & Spaghetti recipe.


All I do is heat up some pieces of salami and then set it aside. I fry up some onion and garlic in the flavorful rendered salami fat; the cooked salami is added back and finally, the cooked pasta, along with a little pasta water, is mixed in. And it's all served with a sprinkle of parmesan cheese topping. (If you have a few leaves of fresh window-box herbs, then add that as well.)


For this recipe, I'm also using wheat pasta. Like brown rice, there is a subtle difference in texture and flavor, but it's pleasing enough. The more I cook with it the better I like it. Pasta is just the delivery device for my sauteed salami recipe.

I always have a package of pasta in the cupboard, a small package of sliced cured Italian sausage in the freezer, and some onion and garlic in the refrigerator. (Some Italian sausage that is dry cured and can be kept at room temperature in the cupboard as well.)

 This meal comes together in about the time it takes to boil a pot of spaghetti. And after a long day's grind, it is satisfying and easy to do. The 99 Cent Chef has your back -- give my Salami and Spaghetti a try if you are broke and have very little time to spend at the stove.

 
Ingredients (about 2 servings)
  • Salami - 3.5 ounces, thinly sliced. I used Genoa Salami, but you can use cheap pepperoni or any inexpensive cured sausage.
  • 1/4 onion chopped - white or yellow.
  • 1 teaspoon garlic - fresh or from the jar.
  • 1 teaspoon oil
  • Parmesan cheese - I used a couple tablespoons of dried, but you can use fresh graded or any type you like.
  • Pasta - about a third of a 16-ounce package. I used wheat spaghetti, but you can use any type you have on hand.


Directions
You can start the pasta water to boil.

I used large thin slices of salami, so I first cut the salami into bite-sized pieces. Over medium heat,  I added the pieces along with a teaspoon of oil. I cooked the salami for about 2 minutes until heated through and some of the salami fat was rendered. (Cooking time may vary by a couple of minutes, depending on how thick your Italian sausage is.)


Pasta water should be about boiling now, so add pasta and cook according to directions.

Remove salami when lightly browned and set aside. Next, add the chopped onion and cook for 2-4 minutes more until soft. Add chopped garlic until the last minute. Be sure to scrape the pan during veggie sauteing to get all the tasty charred bits loose.


When onion and garlic are cooked add the cooked salami and heat through for another minute.


Pasta should be done by now. Just remove it and add directly to the onion, garlic, and salami. Finally, pour in a couple of tablespoons of pasta water and mix it all together. (if pasta is done early it's okay to remove, making sure to reserve some pasta water.)

Top with fresh grated or dried parmesan. If you have some fresh basil, sage, or oregano, then roughly chop it, and mix in about a tablespoon -- I especially like to mix in a bunch of roughly chopped or torn basil leaves.

Wednesday, September 18, 2013

The Pork Butt Trilogy - Video Recipes

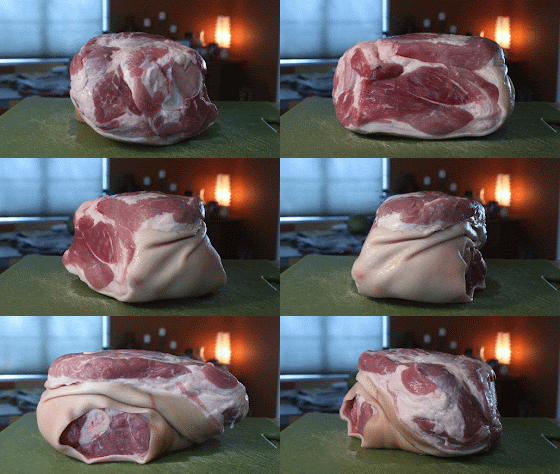
Allow me to sing the praises of Pork Butt. Any cut of meat with a lot of marbling attached to a club-sized center bone and wrapped in thick skin is going to make a soul-satisfying dish. But you need to slow-cook it. Fortunately, you can walk away and go about your business once it's underway.


And the reward is the tenderest and most succulent bites of meat you can ever have. Slow-cooked pork takes on complex spice characteristics, sweet or tart fruit juice flavors, and pungent herb combinations.

Every culture that is introduced to pork makes it their own. And in The 99 Cent Chef's latest swine series, Latin, Italian, and good old Southern Americana cooking make an appearance in this Pork Butt Trilogy of stop motion videos.

Next to chicken, Pork Butt, or Pork Shoulder, is cheap enough for this miserly cook. I get mine when it's on sale at my local Latin market -- anywhere from 77 cents to 98 cents per pound. Even when not on sale, it's usually no more than two dollars per pound. Calling Pork Shoulder a Pork Butt is falling out of fashion, but as long as the name gets a smile I'm sticking with Pork Butt.


These cuts of pork are large, usually in the 5 to 9-pound range. And one large Pork Butt will easily feed a party of twelve. For two of my recipes, I break the Pork Butt down, slicing off the skin and cutting off the meat from the bone. In both cases the skin is cooked: crunchy Chiccarones, (blistered fried pork skin,) and crispy, brittle roasted pig skin.


I didn't notice what I had until this Pork Butt series was almost finished. In March I made a Mexican Carnitas video featuring Pork Butt, then during August I slow-roasted an Italian Porchetta, followed, a couple of weeks later, by smoky  BBQ Pulled Pork -- all shot as stop motion animation. It's a unique video series I know you will find entertaining.


Part one of my Pork Butt Trilogy is street food done Latin-style. Carnitas Tacos are my go-to selection when on a midnight taco truck run. You can read all about my Mexican Carnitas recipe by clicking here. Carnitas is pork that's slow-cooked in orange juice, Mexican cola, oregano, garlic and a few other spices. My Carnitas blogpost if filled with yummy photos and clear step-by-step instructions to easily and cheaply make enough Carnitas for 20 tacos. Watch the video below to see what I mean.


Part two of my Pork Butt Trilogy is a Southern culinary classic, BBQ Pulled Pork. Maybe my favorite of this series? Well at least for now, as my wife has be requesting it the most. We both spent time in the South, so Pulled Pork can easily become part of your DNA. My video recipe shortens the smoking time, but the flavor is 90% there -- experts can tell the difference, but once you take a bite of lightly smoked BBQ Pulled Pork hot off the grill, you'll still be put into a protein coma.


The 3rd video of my Pork Butt Trilogy is Italian Porchetta. Wrapped in pork skin and slow-roasted, Porchetta is intensely pungent -- perfumed with fennel, sage, and rosemary. It's all about herbs for this dinner table centerpiece. The stop motion video is shot, now all I have to do is edit it together and get the photo recipe instructions laid out.


Coming soon so do check back for more of my Pork Butt Trilogy.

Thursday, September 12, 2013

Grilled Zucchini with Herbs - Video Recipe

Zucchini is a veggie that cooks great on a grill. Sometimes referred to as Italian squash were this variety was developed, zucchini is actually closer related to a cucumber or melon.


And is a perfect size for quick grilling. It only takes five minutes or so, depending how hot your grill is. It's also quick to get ready. All I do is slice the zucchini lengthwise, make a few cuts into the flesh, rub on some olive oil, season with salt and pepper, then finish by sprinkling on your favorite dried or fresh chopped herbs.


I like to grill potato slices beside my hamburger, but sometimes I mix it up with fresh grilled veggies -- this is an especially lighter way to go if your reducing carbs. You can cook zucchini well done and mushy, or lightly, leaving a little crunch in. And I've cooked it simply with just oil, salt and pepper. (At the end of this post under Hindsight I have an easy oven method for my visitors without an outdoor grill.)


Zucchini is a cheaper priced veggie. It tastes closest to yellow neck squash. I especially like the extra smokiness you get with grilling. So check out my stop motion video below and see how easy it is to do.

Grilled Zucchini VIDEO

Play it here, video runs 2 minutes, 22 seconds.

My YouTube video link for viewing or embedding, just click here

Ingredients (serves about 3-5)
  • 2-4 zucchini - cut in half, lengthwise.
  • 2 teaspoons of olive oil - or your favorite cooking spray. Use as little as you want. It's okay to brush (or rub) on oil for a light coating. Leave out oil for a low-cal version, it will still cook up fine.
  • 1 tablespoon each of favorite herb - roughly chopped. I used basil, oregano and sage.
  • (or 1 tablespoon total of dried herbs - any favorite or herb blend)
  • Salt and pepper to taste.


Directions
If you are using a charcoal or wood burning outdoor grill then get it going first.

Slice zucchini in half, lengthwise. Make a few small slices into the flesh - not too deep, just a quarter of an inch or so. This will speed up the cooking and holds in some of the herbs and oil.


Lightly coat the zucchini halves with oil. You can just spray with oil, or brush on some oil, or even use your fingers and rub on the oil. (For a low-calorie version leave out the oil - the zucchini grills fine and still tastes great.)


Add some salt and pepper to taste.


 Roughly chop fresh herbs and mix together. If you are using dried herbs you can add them one at a time or premix them. Top the zucchini with herbs.


Now time to grill the zucchini. I have a cheap patio gas grill. I like to use a low/medium heat so it's easier control the charring. I usually cook the outside of the of the zucchini first for 3-5 minutes until the edges brown.


Next I turn them over and finish the grilling until the oiled skin starts to brown. It's up to you how much browning you want. The green skin will brown while the whiter inside just gets grill marks. It's ready when soft to the touch with tongs or spatula - about 5-8 minutes total, depending how hot the grill is.

If you have a charcoal grill then keep the zucchini on the edge of the fire for more control. You will have to babysit the veggies to keep them from becoming totally burnt.

Ready to eat right off the grill.

Hindsight
If you don't have an outdoor grill, it's easy enough to do in the oven. Just follow the directions above and finish in a 350 degree oven for about 30 minutes. You can bake the zucchini a little longer to desired tenderness.

Kick it up a notch  with a sprinkling of cheese during the last 5 minutes of baking.

You can leave off the oil for low-cal fare. 

Friday, September 6, 2013

Onion and Parsley Salad Dressing

Sometimes The Miserly Vegetarian abandons meat and digs into a salad. My wife has a large selection of bottled salad dressings stored in the refrigerator door. Most of them are way too sweet and loaded with additives. Hey, I still use them all the time, but I like to make my own on occasion.


The base ingredients are blended oil, vinegar, a fresh herb and an onion. The onion gives my homemade Salad Dressing a creamy texture and a fresh herb adds fragrance and color. For this recipe I used fresh parsley, but you could also use basil, oregano, sage or any favorite herb. Parsley is quite mild so I added a lot; for other herbs you may want to half the amount I have listed below. (Or add a little at a time when blending.)

If you have an herb garden like me then you can't get herbs any cheaper. Onions and lemons are on sale often enough -- while olive oil is the most expensive item, you are not using that much.


My Onion and Parsley Salad Dressing can be added to sandwiches as well. It would pair perfectly with my Veggie Wrap ( for recipe click here.) Store it in the refrigerator in a sealed container and you may find yourself reaching for it more than those bottled, sugary, mystery salad dressing blends.

So check out the list of salad recipes that would host my delicious dressing. And click on a name to see the recipes of: Under 2 Minute Salad, Thai Cucumber Salad, Watermelon, Mango & Spinach Salad, Warm Steak Salad, Cuban Salad, and a Beet & Tangerine Salad. (Wow, I just noticed how short the list is -- I need to remedy this and come up with more...so do check back for healthier leafy fare.)


Ingredients (about 6 servings)
  • 1/2 onion - any type. I used a yellow onion
  • 1/4 cup olive oil
  • 1/2 bunch parsley - about a cup.
  • Juice of one lemon - about a 2 tablespoons, fresh or from jar. Okay to substitute with vinegar.
  • Salt and pepper to taste - optional.


Directions
Remove longer stems from parsley. Roughly chop 1/4 onion so it fits into a blender or food processor.


Add both to the blender or food processor. Pour in olive oil. Squeeze in lemon juice (filtering out seeds.)


Pulse/blend until onion is pulverized into a creamy liquid. Parsley is cut into small flakes. Oil and vinegar will be well mixed.


Ready to serve when blended. To store, refrigerate in a container with a tight top so you can shake it before each serving. Will keep for about two weeks, or until herbs start to turn brown.