Monday, March 27, 2017

Roast Chicken with Rosemary - Video Recipe

Roast chicken and herbs belong together. If you have a herb window box or small herb garden then this recipe is for you. Even dried herbs will work quite well. My latest recipe video of Roast Chicken with Rosemary is the best of both worlds.


Rosemary is quite a pungent herb that is easy to grow. I have a large bush of it just outside my patio, and I offer clippings to my neighbors anytime they want some. Rosemary is a perennial so you an cook with the needles all year around. Just remove the needles from the stem and you are ready to start cooking. My recipe calls for about 2 tablespoons, but use as much, or as little, as you like.

Chicken is a tasty canvas that absorbs flavorful marinades and spices easily. I get whole chicken for less than a buck per pound so the price is right for this pullet fan.

My Roast Chicken with Rosemary can be adapted for any favorite chicken pieces you can get on sale - I like to cook with budget leg quarters and you can add rosemary to chicken breasts, too.


The only prep is loosening the chicken skin around the breast and legs. Wash your hands and slip your finger under the breast meat first, it's the easiest way to start. Slide a finger (or two) left to right. I have used a wood spoon. Metal utensils may tear the skin too easily. But if you tear the skin it's okay; don't worry about it as you will get better the more you do it.


Leg and thigh skin is a little trickier to work with. Just loosen as much as you can - rosemary is so pungent, it only takes a few needles to flavor the legs and thighs. If you have large sprigs of rosemary, and don't want to fool around with all the skin, just slide a branch or two under the breast and add some more to the chicken cavity (of course remove the large sprigs before serving.)


Everyone and their grandmother has a roasting method for chicken, and it mainly revolves around how to keep the breast moist. Some go for brining the bird in a salty solution, ultimately too salty for me - you can't rinse it all off. A roasting bag works pretty well, although the skin stays soggy. You can cover the breast with foil the first hour of baking - a pretty good method. If you have a cast iron skillet then heat it up and add the chicken - this will reduce the cooking time because the dark meat cooks a fast as breast meat (plus this reduces the overall cooking time, too.)


Pssst...here's my secret: roast the bird upside down!  And turn it over after an hour, so the breast skin get crispy. But you can use any method you like. Mainly cook chicken at 350 degrees for about 20 minutes per pound. You want juices near the thigh bone to run clear - no red or pink juices. A final check is when an inserted meat thermometer reads 165 degrees.

Any way you cook it, my Roast Chicken with Rosemary will have everyone at the dinner table asking for seconds....and thirds!

Roast Chicken with Rosemary - Video

Play it here. Video runs 2 minutes, 11 seconds.

My YouTube video link for viewing or embedding, just click here.

Ingredients (2-4 servings)
  • 1 whole chicken - mine was 5 pounds.
  • 2-3 sprigs of rosemary - Remove needle-like leaves from stem. Okay to use a tablespoon of dried rosemary.
  • Salt and pepper to taste.


Directions
Remove any chicken parts from the bird cavity. (You can salt and pepper the heart, gizzard, liver and neck and bake it with the whole chicken - neck takes 45 minutes to cook, but offal bits only take about half hour or less.)

Rinse off the bird. Use your finger(s) and gently separate the skin from the flesh. You don't have to totally loosen all the skin, just enough to get some rosemary needles on the breast, legs and thighs.


I loosen the skin around the breast tip (above the large chicken cavity) and wishbone/neck area. The skin may tear a little, but that's okay.


The leg and thigh is a little trickier to do. If you flip the bird on it's back you can work a finger into the thigh area. You only need to loosen some skin around the thick part of the leg.

Again don't to go overboard with the skin loosening. If you don't want to trouble yourself with all that, then just make 2 or 3 loose areas and slide in a whole sprig at a time. I would have 2 sprigs, one for each side of the breast and a half sprig for each thigh.


Bake the whole chicken at 350 degrees, for about 1 hour and 30 minutes, to 2 hours total. Baking time will vary depending on how big the chicken is. For my 5 pound bird I roasted it for an hour and a half. You can average 20 minutes baking at 350 degrees, per pound of chicken.


A whole chicken is ready when a meat thermometer inserted into the inner thigh (close to but not touching the thigh bone) reads at least 165 degrees F (74 degrees C.)


I usually just slice into the leg/thigh at the joint and look for clear juices. If the breast is done and the leg/thigh is not, first cover the breast in foil, then just slice the thigh to the joint (exposing the red part,) and let it bake a little longer, as you set the table. The leg/thigh may only need another 10 minutes more.

Hindsight
One way to get a moist chicken, without drying out the breast, is to bake it backside up, or breast-side down, to start. After an hour I turn the chicken over and finish baking breast-side up. Looks funny to start, but the breast meat ends up very juicy.


And the only trick is turning over a hot bird. You want to remove it from the oven first. I use two large spoons, one inserted into the neck and the other spoon inserted into the large cavity near the legs. Then pick up the bird and turn it over, breast-side up. Return it to the oven to finish browning the breast skin.

Another great way to roast the bird is the normal way (breast side is up), but on a hot cast iron skillet. Cast iron will hold heat and cook the dark meat quicker, about the same time it will take the breast to cook through. That's the beauty of this method - both dark meat and white meat are done at the same time. Plus you shave off 15 minutes of cooking time (it took an hour and fifteen minutes for mine.)

But you can cook your bird anyway you like.

This recipe works for chicken pieces like leg quarters or a whole breast. The cooking time is shorter, closer to an hour.


If you don't have rosemary, try out any fresh herb you can get. If I'm not familiar with an herb, add a little to a quick egg scramble to taste the cooked herb flavor.

Monday, March 20, 2017

Broccoli Rabe & Smoked Provolone - Deal of the Day

Broccoli rabe is more stem than what I am used to, and that's fine. Broccoli rabe has a slight bitterness compared to milder grocery-stocked large heads of broccoli.

For my latest Deal of the Day review of World Menu's Broccoli Rabe & Smoked Provolone, it's all about an Italian-style veggie side dish.

When defrosted, this broccoli rabe is tender but still a little crunchy --  not mushy like typical frozen veggies. World Menu does a good job of pre-cooking and freezing.

If you like large tender florets of broccoli then you may blanch at this type of more stringy, but supple, broccoli.


When microwaved the broccoli rabe sweats and the liquid is infused with smokey flavor. The smoked provolone cubes are small, but they give you enough flavor.

Once melted and mixed into veggies they add a delicious touch of richness. The smokiness does not overpower, which would be easy to do in the case of mild provolone cheese.


You do want to microwave in 30 second increments so you can catch it when the cheese is hot, but soft and melty - it would be easy to dry it out to a rubbery consistency with too much cooking.

Thankfully the ingredient list is short, mainly broccoli rabe, cheese and spices - and imported from Italy.


So on the Cheap$kate Dining Scale of 1 to 9, 9 being best, I give World Menu's Broccoli Rabe & Smoked Provolone a perfect 9. This is a delicious side that with careful reheating will make any meal shine.

Monday, March 13, 2017

St. Patrick's Day Recipes - Deli Style

St. Patrick's Day is the time to dress in green and put on your yarmulke? That's if you're combining the cuisines of the Emerald Isle and the Promised Land. And you'll feel like you've found that leprechaun pot o' gold at the end of the Western Wall when you try my luscious Jewish recipes using Irish corned beef, that's now on sale this week.


I like traditional Irish corned beef and cabbage and it's easy enough to make, but for the money, I like my corned beef between 2 slices of rye and topped with a cabbage coleslaw, Jewish deli-style. So just keep on reading to see my tasty recipes below for Deli Corned Beef and Homemade Pastrami.

If you didn't notice, this week is the time of cheap hunks of corned beef -- starting at $1.99 per pound! I usually clear out my freezer for this St. Patrick's Day beef celebration and stock up on a few corned beef briskets. They freeze well and I like to smoke them during my patio summer cookouts.


Corned Beef is easy to make. To a pot of water just add the package of herbs (that come in the corned beef package) and toss in a few chopped veggies. You can boil the corned beef on the stovetop or bake it in the oven. I prefer the oven method, so you get a slightly browned crust, but the inside will still be moist.

You'll also want a batch of coleslaw to go along with my Homemade Deli-Style Corned Beef Sandwich. Especially when cabbage is selling for pennies a pound this week. Just click here to get a cheap$kate Deli Coleslaw recipe.

Our most famous deli in Los Angeles is Canter's Deli on Fairfax Boulevard. They are especially known for Pastrami and Corned Beef Sandwiches.


For their 60th Anniversary at this location, they served Corned Beef on Rye Sandwiches for 60 cents! If you don't believe me, then just watch the video below as proof positive.


And if you have any meaty leftovers then add them to a breakfast scramble of Eggs and Pastrami or Corned Beef (my recipe is a click away here.)


Now, if you really want the wildest use of leftover Pastrami then go no further than the next video, on the making of an Oki Dog.


It is basically a burrito with hot dogs, cheese, chili and pastrami. Yes, it's a cholesterol artery-clogging tortilla-wrapped depth charge that will literally take your breath away. Just watch the video below to see it being assembled (and click here to read all about it.)


In my Pastrami Recipe Video below, I show you how to brine a beef brisket in the refrigerator for a week. But if you buy a package of corned beef, you can skip that stage and go right to cooking it.

A package of herbs is included with corned beef. I like to grind up the herbs, add some pepper, and that becomes the dry rub for pastrami. And the final stage is to smoke the pastrami for about an hour. So keep scrolling down to see my Corned Beef and Pastrami recipes (you can also click here to see more Pastrami Recipe photos and text.)


So keep an eye out for that yarmulke-wearing leprechaun with a tzitzit under his green jacket. If you catch him make sure one of your 3 wishes is one of my delish dishes.

This St. Patty's Day post is all about the beef. So stock up on corned beef and get to cooking. And you can be sure that the Blarney Chef is not full of it this time - these are some of my best recipes.

Easy Homemade Deli Pastrami - VIDEO

Play it here. Video runs 2 minutes 42 seconds.

Corned Beef Recipe Ingredients
  • 1 whole corned beef
  • Water - enough to cover brisket.
  • 1 whole chopped carrot - optional
  • 1 whole chopped onion - optional
  • 1 tablespoon chopped garlic - fresh or from jar.
  • 1 bay leaf 
  • packet of herbs that come with corned beef

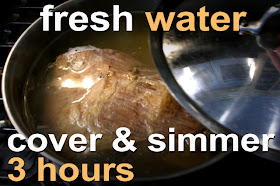
Add enough fresh water to cover the corned beef by an inch. Add the chopped veggies and bay leaf. Bring up the water to a boil, then lower the heat for a low simmer, cover the pot and cook for about 4 hours.


Check every hour or so to make sure the broth does not cookout. Add a 1/4 cup of water at a time, if needed. That's it -- just remove the corned beef and let it cool down enough to slice and serve.


For an oven version, add the veggies and corned beef, then cover and bake in the oven at 350 degrees for 3 to 4 hours. Finally, remove the cover and finish baking another hour -- this will give a nice dark brown color to the outside of the meat.

When slicing the corned beef for sandwiches make sure to cut across the grain of the meat. Of course, you'll want to try out a slice to see how yummy it is. Notice the lean meat and its rosy color inside.


For a Deli-style Corned Beef Sandwich just add mustard to rye bread. Layer on your favorite cheese, corned beef, and coleslaw. From a 2.67 pound of corned beef brisket, I made 3 sandwiches. I served them to my wife, mother-in-law, and our neighbor Deb -- they all raved how delicious it was. I hope you will like it too!


Directions for Cooking Pastrami - using corned beef
Remove corned beef from the package. Add corned beef to a large pot with a cover and fill it with water to just above the meat. Bring to a boil, reduce to a low simmer, cover and simmer for at least 3 hours. Check on it from time to time to make sure the water doesn't cook out (the water can cook out by a third, that's okay, as the meat will continue to steam.)


When finished boiling, remove the meat and set it to drain. Make the dry rub to coat the meat for smoking. Mix the pepper and coriander and coat all sides of the brisket.

Dry Rub Ingredients for Smoking
  • 1 tablespoon ground coriander - they are the tan brown seeds in the herb package that normally comes with corned beef. You can sometimes find ground coriander in grocery spice racks, too.
  • 2 tablespoons ground black pepper - okay to use less. Sometimes black pepper can overpower everything, but I like my pastrami that way.
  • Wood chips for smoking the pastrami in a BBQ grill -- about 4 cups.


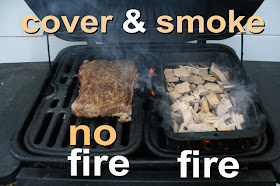
Now time to smoke it. You mainly need an outdoor grill with a cover. I have a 2-burner gas grill. The object is to smoke the meat with indirect heat. That is, place the meat as far away from the flame as possible. The meat is already cooked, so you just want to smoke it at this stage. If you have a simple outdoor charcoal bbq grill then build a fire way off to one side.


The flame is for a pan of wood chips. You could even loosely wrap a large handful of chips in aluminum foil and place over hot coals or the gas flame.

Depending on how hot the flame is, the wood chips should start smoking in about 5 minutes. When the smoke starts, place the boiled brisket as far away from the flame as possible and cover the grill tightly.

Check every 10 minutes or so and replace the wood chips with fresh ones as they cook away, if needed. I smoked my pastrami for an hour. Even a half-hour of smoking will still give great flavor and a crunchy crusted pastrami.


In the hour of smoking, I had to replace the blackened wood chips a couple of times. The meat will still heat up and brown, even away from the heat.

If you are using a coal-burning grill your smoking time may be shorter, as they often burn hotter than a more controllable gas grill (about half an hour of smoking?) The length of time it takes for the wood chips to stop smoking is all the time you really need.

After the pastrami is smoked, place it on a cutting board, slice across the grain, and make a big fat Pastrami Sandwich - your way!


Sunday, March 5, 2017

Yogurt Fruit Cup

I'm sure you've done your own version of a Yogurt Fruit Cup, well here's mine - and I think you will want to make my version some time, too.


I find that yogurt with added fruit, from the grocery cold case, is way too sweet. If you read the ingredients of most brands, you will find sugar, cane juice, and/or fructose near the top of the list.

Click on any photo to see larger.

I prefer plain yogurt with fresh fruit mixed in. That's plenty enough flavor. But if you like your yogurt sweet then add your own favorite sweetener. At least you will know how much you are adding. And use any fave vegan yogurt too.

And, often the fruit on the bottom of the yogurt container is cooked, so it's mushy like jam. Or, if it's not cooked, the texture will still be off.

If the only yogurt on sale has fruit on the bottom then I will spoon out the yogurt and toss the too sweet fruit.

There is a lot of cheap and tasty fruit out there to choose from. So keep an eye open for seasonal fruit that hits the bargain bins at your local grocery store, farmers market, or local fruit stand.

It is quick and easy if you use whole fruit that can be mixed into yogurt, like berries and seedless grapes.


Some fruit will not age well when peeled or sliced, turning brown quickly, like banana and apple, so you want to eat a Yogurt Fruit Cup with these right away. In general it best to make just enough of a Yogurt Fruit Cup to eat in one sitting, as other types of fruit may water down yogurt over a few hours.


Start with a banana, as they are usually the cheapest fruit. During cherry season in May and June (at least out here in Los Angeles) I can find them for around a dollar per pound.


For extra crunch add an on-sale apple. We also get mangoes and peaches cheaply at my neighborhood Latin market.


One pound plastic bins of strawberries cost 99.99 cents at the local 99c only Stores. Whole pineapples even make an appearance there.


You can mix and match any favorite fruit you find. Some fruit may come on sale if it has blemishes. Since you are slicing up the fruit, it won't matter - just cut out any damaged segments.

Start you day with a 99 Cent Chef inspired Yogurt Fruit Cup sometime, especially when fresh fruit is on sale and in season.

Ingredients (2 servings)
  • 2 small cartons of yogurt - I used plain, unflavored yogurt. You can use any type on sale. 
  • 6-10 cherries - seeds removed. Okay to add more or fewer cherries.
  • 1 banana - peeled and sliced.
  • 1 mango - peeled, seed removed, and sliced.


Directions
Mangoes are a bit messy and tricky to work with. They should be ripe first, with a slight softness and yellow or reddish color, depending on the type of mango.

I like to peel them this way. First I slice into the skin from top to bottom four times. Make sure to slice intersecting at the top and bottom.


Now just peel each segment to remove half of the skin, at the widest half of mango. The mango seed is flat and wide so you want to slice off the most flesh along the seed. The seed will guide your blade, just follow the seed as you slice.


Once one side is stripped of flesh, then peel the other side and repeat, slicing along the length of the seed.

You can keep slicing around the seed to get all the mango flesh. Now just cut the mango flesh into bite sizes.


You know how to peel and slice a banana, I'm sure. Just make sure it is ripe.


Cherries are easy to peel, but can be messy, so make sure to work on a surface that is washable, as cherry juice will stain your clothes or any porous surfaces.


All I do to remove a cherry seed is cut around the middle of a cherry. Grab each half and give it a twist. One half of the cherry will separate off the seed. The other half will need to be sliced around the seed to finish removing it. Once you've done it a few times, it gets easier and quicker to do.
 
Once all the fruit is prepared, time to add the yogurt. I add some yogurt in the bottom of a bowl.


Next add the fruit. And finally I mix in the rest of the yogurt.