Friday, April 10, 2015

Broccoli, Tangerine and Yogurt Salad

The Cheap$kate Chef's latest healthy recipe has it all: nutritious veggies, sweet and tangy  fruit, crunchy nuts, pungent dried fruit and creamy yogurt. And my Broccoli, Tangerine and Yogurt  Salad recipe is wife approved!


This low calorie delightful mix is simple to make and taste even better the next day. The most  complicated part is to give the broccoli a quick bath in hot water for a minute, then cool it  back down in cold water. Oh, and there is a little chopping of the broccoli and peeling a tangerine or an orange.


I get all these ingredients cheaply, of course. Fresh broccoli is always coming up on sale. I  like to use the whole thing, stem and all. Usually I peel some of the stem, it's more tender  that way. I blanch the broccoli for a minute, but if you like your veggies extra crunchy and  raw, then skip the blanching.


I used a couple of small tangerines. Oranges are a cheaper substitution and are just as tasty.  Be sure to take out any seeds though. Canned Mandarin oranges are an easy way to go.

I find dried cranberries on sale at my local 99c only Store, but if you can't, then just use raisins, the taste will be fine.


I sprinkled on roasted peanuts. It's best to use unsalted. If salted peanuts are on sale then  use them. Just be sure to brush off the salt. If you rinse the peanuts then blot off the  excess water. The peanuts don't have to be totally dry, since you are adding them to wet  yogurt. Of course, if you or anyone in the family is allergic to nuts, them leave them out, my  salad will be just as delish.

You only need a small container of yogurt. It's best to use plain yogurt. Although I've used  lightly flavored ones like vanilla or honey. And you can use low fat yogurt.


When everything is mixed, keep it refrigerated until ready to serve. My cheap$kate veggie and  fruit salad travels well, either to a party, a picnic, or to the office.

Give this Internet Chef's Broccoli, Tangerine and Yogurt Salad a go. It makes a light and  refreshing  snack anytime of day.


Ingredients (about 2-3 servings)
1 pound broccoli - about 4 cups when florets are broken down and stems chopped.
1 small container of plain yogurt - 5 to 7 ounces or about 3/4 cup. You can use low fat, or  regular yogurt. Okay to add more yogurt to desired creaminess. You can use a lightly flavored  yogurt like vanilla or honey. Fruit yogurt may be too much of a good thing. (And, you can  substitute yogurt with mayo or sour cream.)
1 cup of tangerine or orange - peeled and sliced into bite sizes. Remove seeds if  necessary. You can add more or less to taste. Okay to use a can of Mandarin oranges, if they're cheap enough.
1/2 cup of dried cranberries or raisins - again you can add more or less to taste.
1/2 cup of unsalted peanuts - or any favorite or local nuts, like: cashews, almonds, pecans, walnuts, etc. If salted peanuts are on sale then use them, just rinse or brush off the salt first, or the salad will be way to salty. If you are allergic to nuts them leave them out - the Broccoli  Salad will still be delish.

Directions
Get a pot of water heating up to a low boil.

Prep the broccoli. Chop off the stalks. I like to peel the larger pieces. Chop the stalks into  bite sizes. Separate the broccoli florets into smaller sizes. If the floret is very large  then slice it in half or quarters.


Add the broccoli to boiling water. Cook the broccoli for no more than a minute. You don't want  to overcook. Crunchy is good for this recipe. If you like your veggies really raw then skip it  and go right to mixing all the ingredients together. You can use less water and just steam the broccoli for a minute.


After a minute of blanching add broccoli to a bowl of cold water to stop the cooking. Drain  the broccoli before mixing all the other ingredients.

I use peanuts for my recipe, but you can use any nuts you like or find on sale. For salted  peanuts, brush or rinse them off. Allow the peanuts to dry for a couple of minutes or blot  them off with a paper towel. They don't have to be completely dry, as you will be adding wet  yogurt anyway.

Next, peel a tangerines or an orange. Slice the fruit into bite sized segments. Remove seeds if  necessary.


Now time to bring it all together. In a large bowl, add the drained and cooled broccoli. 


Mix in the fruit, nuts and dried cranberries (or raisins). Finally spoon on yogurt. Mix it all  together.


Store the Broccoli, Fruit and Yogurt Salad in the refrigerator until ready to serve.

Hindsight
Of course, you can blanch or steam broccoli longer to desired tenderness.

Adjust any of the ingredients to suit your taste. If you want more creaminess, then  add more yogurt. If you don't care for yogurt then substitute with mayo or sour cream.

If you have a lot of peanuts to get rid off, then add more to the salad. Same goes for raisins, and tangerine or oranges.

And, best to finish this off in a couple of days, as the yogurt begins to deteriorate and break down - but you can refresh the salad with a spoonful or two of fresh yogurt.

This salad is easy to double for more servings. 

Saturday, April 4, 2015

B.B.Q Pork Steamed Bun - Deal of the Day

I microwaved the most unusual Deal of the Day, B.B.Q Pork Steamed Bun by Tasty Select. You have to trek to a Chinese restaurant for Dim Sum to find these, but I got mine from my local Dollar Tree store.


Lately, I've found that the frozen deli cases at Dollar Tree rival The 99c only Store. A myriad of frozen $1 meals and cold produce like: turkey bacon, feta cheese, frozen veggie and fruit bags, desserts, etc.

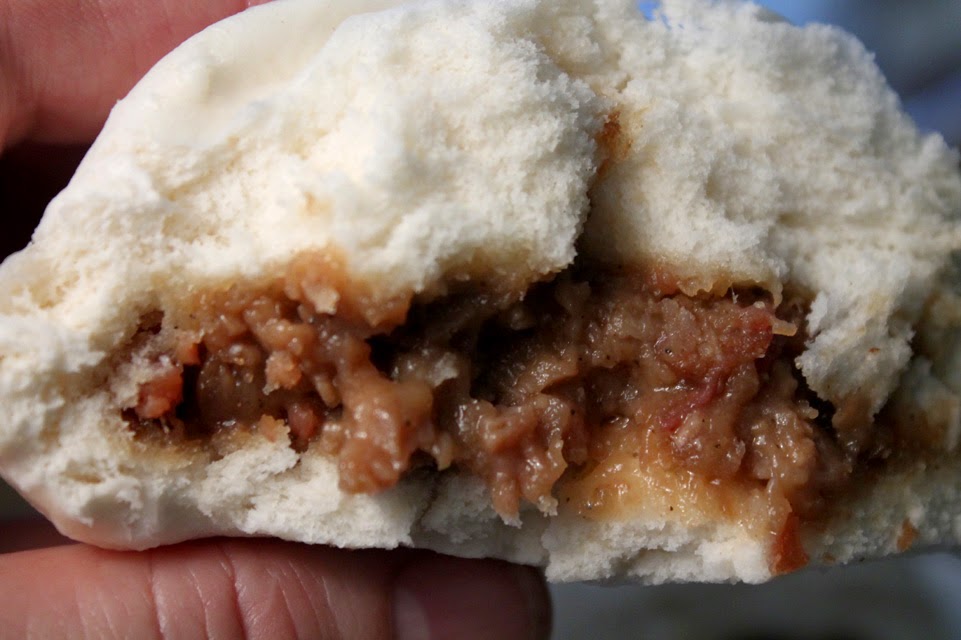
Sometime you gotta take a chance, and when I saw these frozen  B.B.Q Pork Steamed Buns I went for it. And I was not disappointed. This is a savory and sweet snack you can hold in your hand.


Usually, I get golden baked B.B.Q Pork Buns to go from my local Chinese restaurant. This Cheap$kate Deal of the Day is the steamed version - a good second choice.

Steamed buns are light and soft like a snowball. The slightly sweet dough is made right, with the texture of Angel Food Cake. It is a nice sized bun, too.


I was surprised by the well flavored B.B.Q pork stuffing. The gravy is typically sweet and seasoned nicely. Common Chinese spices are easy to spot, like: soy sauce, oyster and hoisin sauces.


And there are real pieces of B.B.Q pork. Now, they are small pieces, but it's the real thing, at least I think it is, or it could just be the flavor of B.B.Q sauce. Pork is at the top of the ingredient list, so I'll take their word. The pork is tender and tasty; a nice pairing with the fluffy steamed bun.

 Click on photo to see larger.

I microwaved the bun for about a minute and a half. The bun remained spongy and light and the meat sauce did not dry out. For variety, next time I would steam it.

I bet you can guess my Cheap$kate Dining Scale rating of 1 to 9, 9 being best. Well, I give B.B.Q Pork Steamed Bun by Tasty Select a perfect 9 ! This Deal of the Day is a real find and I will get more with the next Dollar Tree visit if they are still stocked - you never know, when shopping at 99 cent Only or Dollar Tree stores.

Friday, March 27, 2015

French-style Cheese Omelette - Video Recipe

I have to give it up to Chef Ludo Lefebvre for this luscious French-style Cheese Omelette recipe, that my own version is based on. He trained and cooked in France until making Los Angeles his home.


You may know camera-ready Chef Ludo from his cooking stints on the Food Network and as a chef/mentor of NBC's The Taste.

I'm used to American diner-style omelets that are cooked well done and dry, except for the soft melted cheesy interiors. I always liked my omelets that way, until I watched his own recipe video of how to make the perfect French omelet, his way, and then tried it out for myself. Click here to see what I mean.


Ludo, you have opened my eyes and changed my taste for a simple omelette -- hey, I'll even give you props for changing the way I'll now spell the word, from omelet (sic) to omelette!!

What's different is the way his omelette is cooked. Mainly, you soft scramble the well-mixed eggs, add the cheese while the egg is slightly damp, then gently roll it up. Of course, Americans taste blanched at runny eggs. But the egg is cooked and warmed through, just slightly damp, and this makes all the difference.


But if you insist, you can continue to cook the omelette to your desired doneness.

Chef Ludo also cooks the omelette in lots of butter. And he uses a soft French cheese called Boursin (similar in texture to cream cheese.) For my recipe, I just used easy-to-get Italian shredded mozzarella. You can use any soft cheese you like. I think the main thing is how lightly the omelette is cooked.

He finishes the omelette with a smear of butter and tops it with chopped chives. For my recipe, I skipped the butter finish (gilding the Lilly, methinks) and used a little chopped parsley, instead of chives, as a topping.

Eggs are still priced reasonably. I can buy a half dozen-size container at my local Dollar Tree store, sometimes. I always find small packages of cheese cheaply.


This omelette is versatile. You can also add some sauteed spinach or mushrooms. If you have any favorite omelette ingredients, then try them out, too.

Any way you spell it, omelette or omelet, this recipe is one you can take to the bank! A buttery soft scramble with cheese makes a luscious breakfast.

And, here's my Americancheap$kate video recipe below. Once you try my version of Chef Ludo's French-style Cheese Omelette you will cry sacre bleu! And bon appétit from this Internet Chef.

French-style Cheese Omelette  - VIDEO

 Play it here, video runs 2 minutes, 27 seconds.

My YouTube video link for viewing or embedding, just click here.

Ingredients (one omelet) 
3 eggs - I used medium size eggs.
1/4 cup soft cheese -  Add more or less to taste. Any favorite is fine. I used shredded mozzarella.
1 tablespoon salted butter - If you use unsalted, then add a little salt to the egg. Okay to use a butter substitute, or just plain cooking oil. But, butter does add a lot of flavor.
Pepper to taste - I left out salt. I find the cheese and salted butter is enough.
A few chopped sprigs of parsley or chives - optional. Sprinkle on the omelet when serving.


Directions
For this recipe, it's best to use a non-stick frying pan, (8-inch diameter.)  For a regular pan, you can use more butter (or cooking oil) as needed to keep the cooking eggs from sticking.

Crack open eggs and add to a bowl. Whisk the egg for a minute to mix completely. Add pepper to taste to blended eggs. If you are using unsalted butter, then you can add a pinch of salt.


Add a tablespoon of salted butter to a medium-hot pan. Reduce heat a little, when the butter melts. You want a pan that's not too hot, so you can watch the eggs form a soft scramble.


The trick is to gently stir the heating eggs, but keep a solid layer of egg to add the cheese onto.


The egg is heated through, but not cooked all the way, yet. Add the cheese when the egg is still slightly damp.


Now you just gently roll up the omelet. Just lift the edge of the cooked egg and fold it partway. Keep rolling to cover the cheese. When the omelet is rolled to the other side of the pan, it's ready to serve. I like my omelette slightly damp and creamy inside.


If you like your omelette well done, then keep cooking it for another 30 seconds to 1 minute longer. You can flip the omelette over to cook thoroughly. Check for desired doneness by slicing into the thickest part of omelette.

Finally, top with a little chopped parsley or chives (optional.)

Saturday, March 21, 2015

Rice Bowl with Chicken & Veggies

For all my university dorm room dwelling visitors I have a cheap and quickie meal for you. And it's even nutritious! So get out the hot plate and cook up my steamed Rice Bowl with Chicken & Veggies recipe. This tasty meal is cheap too.


And it's a one pot meal that only takes the time to cook a cup of rice. And as for vegetables, I add a frozen veggie mix. There are a lot of different types, so you can use any favorite, like: Oriental Stir Fry, California Blend, and Cauliflower, Broccoli, Peas, Corn and Carrots. You can even combine almost any other veggies you find in your local grocery frozen case.


For protein I add a small can of cooked chicken. It's about the size of a can of tuna. If you prefer cooked roasted chicken from your neighborhood grocery, then use some of that.


If you want to kick the meal up a notch, then top it all with a fried egg. Many Eastern cultures top an entree with a fried egg. Mix in a creamy yolk with the Rice Bowl and you'll see and taste why.


One pound packages of frozen veggies are cheap at any grocery store or Dollar Tree. You know how inexpensive rice is. As for chicken I get small cans of it from my local 99c only Store.


If chicken is too expensive then top the cooked veggies and rice with a fried or scrambled egg. Of course, you can keep this meal vegetarian and leave out the chicken and egg.


You can drizzle on my Rice Bowl with Chicken & Veggies a favorite condiment, like soy sauce, chili sauce, sweet and sour sauce, hot sauce, or anything you have on hand.

So just dump in those cheap ingredients into a pot and and get to cooking. You and your dorm roommate can devote your new found time to studying (yeah, right) while my simple and tasty recipe cooks away.


Ingredients (about 2 servings) 
1 cup of rice - white or brown rice.
1 package of frozen veggies - about 1 pound. Okay to use any favorite type, like:  Oriental Stir Fry, California Blend, and Cauliflower, Broccoli, Peas and Carrots. You can combine any you have in the freezer.
1 small can of cooked chicken - I used a 5 ounce can. Okay to use any leftover cooked chicken, included roasted chicken from your local grocery deli department.
1 1/2cups of water - for cooking rice. Normally it's 2 cups of water, but frozen veggies also provide liquid, so less water makes for less mushy rice.
Pepper to taste - I leave out salt, as the canned chicken has enough salt for me, but you can add some if you like.
Optional - Add a fried egg on top of finished rice bowl.


Directions
 In a pot or rice cooker add water, rice, chicken and frozen veggies. You can add the liquid from the canned chicken too.


Cook according to rice package directions. Usually, bring water to a boil. Cover pot and reduce heat to low, and simmer for about 20 minutes. Let the rice rest covered for 5 minutes more.


For extra protein, while the rice is resting, fry an egg to top your Rice Bowl with Chicken & Veggies.


Hindsight
You could use raw chicken, but cut it into small bite-size pieces, so it cooks all the way through. And mix chicken into the rice and water. When done, cut into largest piece of chicken to make sure there is no pink color.

To fry an egg, like they do for a Japanese rice bowl, just add a tablespoon of oil to your egg pan over a medium heat. Crack an egg and add it to pan, careful not to break the yellow yolk. Now just let it cook until the white is cooked solid and the yolk is still soft. No need to turn the egg. When egg is done gently scrape it loose from the pan. Place the fried egg on the Rice Bowl when serving.

This meal is easy to reheat in the microwave the next day, too.

Sunday, March 15, 2015

Warm Artichoke Dip

This Mad Man era party dip is best served accompanied with a cool dry martini. Surround this bowl of warm creaminess with your favorite chips, crackers or fresh cut veggies. Almost anything goes with this classic party appetizer, Warm Artichoke Dip.


There's nothing to it. Just drain a can of artichoke hearts or bottoms, and add it to some room temperature cream cheese, dried parmesan, garlic powder, mayo and chopped green onion. Mix well and finally pop it in the hot oven for about half an hour.


Plus it's easy to reheat in the microwave, so go ahead and make my Warm Artichoke Dip way ahead of time. Store the Dip in the refrigerator until ready to heat up, and serve.


You can keep it fairly low calorie with reduced fat cream cheese and mayo. I usually find cans of artichoke hearts or bottoms at my local 99 cent Only store. Now, they also sell jars of marinated artichoke hearts, but don't use those as the vinegar and oil marinade is quite strong and too sour for my taste. (Marinated ones are best used in a pasta sauce or salad, or on a plate of dried meats, olives and cheeses.)

Artichoke hearts from the can are tender, although the small leaves have a little texture; while artichoke bottoms are more tender, as soft as room-temperature cream cheese.

If you are looking for a tasty party dip, look no farther, give my old school Warm Artichoke Dip a go.


Ingredients (enough appetizer for a small party)
  • 15.5 ounce can of artichokes - I used "bottoms," but it's okay to use artichoke "hearts." Don't use marinated artichokes (usually in a small jar.) The vinegar in marinade is too sour.
  • 8 ounces cream cheese - I used low calorie. Okay to add even more, if you like.
  • 1 cup mayo - I used light mayonaise. Okay to use your favorite kind.
  • 4 tablespoons of parmesan - I used dried, but you can also use fresh grated. Save one tablespoon to sprinkle on finished dip just before you put it in the oven.
  • 1 teaspoon dried garlic - powder or granulated.
  • 1 teaspoon  Worchestershire sauce - optional.
(No salt needed as cheeses and canned artichoke have plenty.)

Directions
Chop one green onion into small pieces, green stem included.

Bring cream cheese to room temperature. Put it into a large bowl. Also add 1 cup of mayo.


Drain can of artichokes, either hearts or bottoms. They will be soft so you only need to roughly chop them. Add artichoke to cheese and mayo.


Finally mix in chopped green onion, garlic powder, and Worchestershire Sauce.


Take a fork or spoon and mix all ingredients together. If cream cheese is room temperature it will mix fairly easily. No need to overmix it, just do it for 15 seconds or so. It will all melt together once it's baking.


Set oven to 350 degrees. Add Artichoke Dip to a baking dish. Sprinkle on a tablespoon of parmesan cheese.

You want the dish small enough so the Dip will be about 1 1/2 to 2 inches deep. If the dish is too big then the Dip will spread out too much and may overcook and dry out.

Bake Artichoke Dip uncovered for about 30 minutes. Check every once in a while to make sure the cheese doesn't burn.

 Remove Artichoke Dip from the oven and let it cool down enough to eat warm, about 2-4 minutes.

You can prep chopped veggies or crackers while the Dip bakes.

My Artichoke Dip heats up fine in the microwave, so you can tote it to a party and share.

Related Posts Plugin for WordPress, Blogger...