Friday, February 24, 2012

Homemade Egg McMuffin - Sandwich VIDEO

The master of low-priced cuisine raids the corporate kitchens of the world's largest fast food purveyor (and California native,) McDonald's, and builds his own Egg McMuffin. In the final video of February Sandwich Month, this culinary sleuth takes you from the drive-thru to making your own egg frying ring -- you know that eggs don't come out of the shell in the shape of a hockey puck, right? And in a stop motion animated style, you'll see all the easy cooking steps -- entertainingly so. 


I lost my Egg McMuffin cherry at Mickey D's in the 1970's. It was love at first bite -- a crunchy English muffin with a soft, sour-doughy texture, segueing into hot melted American cheese covering a firm springy disc of egg, and finishing up with smokey-sweet Canadian Bacon. A truly international melding of flavors, the Egg McMuffin is built to satisfy.


Initially, McDonald's corporate elites threatened to close down the Santa Barbara-adjacent franchise that created this breakfast treat. But when its owner, Herb Peterson (who also invented it), served it to McDonald's big cheeses, it took hold and took off from there.

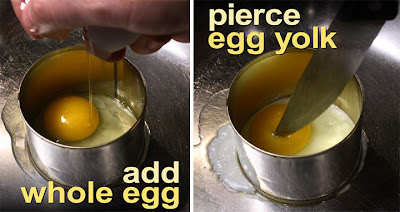
The trick to an Egg McMuffin's pleasing visual aesthetic is a metal frying ring. You saute the egg in it, and you also cut out a circle of ham and cheese. (Canadian bacon is normally used, but hard to get here, so I am substituting similar-tasting ham.) I made my own egg frying ring from a discarded can of water chestnuts that I got for 49 cents. Its diameter is about the same as an English muffin.


Any can with a similar diameter is fine to use, just make sure you can remove both ends with a can opener -- a tuna is the right size, but it has a rounded bottom that is too hard to cut through, so stick with cans where the bottom is the same as the top lip. I originally used a 16-ounce tomato sauce can but changed to a shorter water chestnut can so I could better photograph the frying egg. You can also use the metal lid of a canning jar. I've cooked up half a dozen Egg McMuffins so far and the ring is holding up fine.

Eggs Rings can be found and they are made especially for round-shaped eggs.


McDonalds Egg McMuffins cost $2.59 plus tax. Except for the thick ham slice (I could've bought a package of thinly sliced ham for 99.99 cents,) all the ingredients I picked up were cheap. For about $4 worth of supplies, I can make six Egg McMuffins easily -- that's way less than a dollar apiece, and I still have eggs left over. And I don't have to eat breakfast in the parking lot!


So if you don't want to waste gas in the drive-thru or wait in line, be sure to watch my easy-to-follow video directions and make your own Egg McMuffin while wearing your pajamas - 99 Cent Chef style.


Since I have a frying ring, now I need to figure out how they get that syrup into a McGriddle pancake breakfast sandwich -- so I can start making my own!

Homemade Egg McMuffin - VIDEO 

Play it here. Video runs 3 minutes, 15 seconds.

To view or embed from YouTube, click here.

Ingredients (one sandwich)
  • 1 egg
  • 1 slice of ham or Canadian bacon - I used a thick slice of ham, but you could also use cheap packaged thin-sliced ham.
  • 1 slice of American cheese - or any favorite cheese.
  • 1 English (style) muffin
  • Oil for metal egg ring - I used cooking spray. You could also smear on regular cooking oil.
  • Salt and pepper to taste - optional for seasoning the frying egg.


Directions
I made my own egg-frying metal ring. You want a can that is as wide as a muffin, so the egg is not too large or too small. I found that 16-ounce tomato sauce cans work well. You want a can that does not have a rounded bottom, as it is too hard to remove. I used a short can of chestnuts for this video -- so you could easily see the egg cooking. One can that does not work is a tuna can (although it is the right diameter) because it has a rounded bottom. Now they sell Egg Rings for round-shaped eggs.


Remove the top and bottom of the tin can with your can opener and empty it. Wash and rinse out the can so canned flavors do not contaminate the frying egg. When the can is damp it is easier to remove the label. If you do not get it all off, that's okay -- the sides of the can do not get that hot. Dry off the can.


I found it easy to use the can to stamp/cut out the American cheese and ham. My ham slice was thick, so I had to use a knife to slice it all the way through. Set aside round-cut cheese and ham.

Use your favorite omelet pan over medium heat. Lightly oil the inside of the egg metal ring with cooking spray (okay to wipe on regular veggie oil.)


Place the ring in the heating pan. Add one egg into the ring. You can scramble the egg first (any way you like it ) in a bowl, and then add it, or just break the egg directly into the ring. A little egg may leak out the bottom of the can, but not that much. Take a fork or knife to break the yolk (or not, it's up to you.) Over medium heat, it takes about 5 minutes for the egg to cook through, since it is a thick puck you are frying.
 

It's best to leave the can alone so the bottom of the egg gets a nice crusty bottom. As the top of the egg starts to get firm, it's time to add the ham and toast the English muffin.


You can heat up the ham in the same frying pan if there is room. When the top of the egg looks firm enough, take a butter knife and loosen the egg from the inside of the can. Remove the can from around the egg - and depending on how hot the pan gets, be careful when handling the egg frying ring. Use a spatula to loosen the egg from the frying pan and flip it over.


Add the cheese to the egg. Heat ham through as muffin toasts. The egg only needs to cook for barely a minute more. Remove the egg and cheese if the ham takes too long to heat through -- no need to overcook it all.


When the muffin is lightly browned, and the ham is heated though, assemble the Egg McMuffin.

Hindsight
If you don't like a crispy skin on your egg, you can add a 1/4 cup of water to the frying pan or a pot with a cover (once the egg is in the ring,) so the egg poaches, instead of frying (add more water if it cooks out before the egg is firm.) Drain out the water when it is time to remove the ring and flip the egg over (to finish cooking.) Obviously, you will heat up the ham in a different pan, or just microwave.

McDonald's sells a Sausage McMuffin, too. That's easy enough to make at home as well. Just start the sausage cooking earlier or pre-cook it. An Egg McMuffin is just as tasty without meat - egg and cheese is satisfying enough.

McDonald's brushes the muffin inside with butter, I left it off. Instead, I like mayo on my breakfast sandwiches. You can also add lettuce and tomato for fresh roughage.

If appearance is unimportant, don't cut the ham and cheese into discs, or even cook the egg in my homemade frying ring. Just cook everything the way you like it and build a breakfast muffin sandwich to suit your own taste.

Saturday, February 18, 2012

Fried Alligator Po' Boy - Sandwich VIDEO

While conversing with a swamp gator in my latest video, this cheapskate Dr. Doolittle cuisinier finds out what an aquatic reptile's favorite meal is (hint - the alligator was eyeing my flank a little to close for comfort!) 

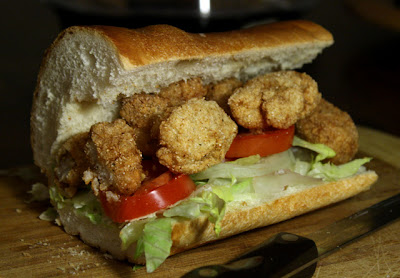
That's just one outre scene from my video shoot in Creole country -- you will also get a cooking tutorial from my Cajun nephew, Chef Matt, followed by a Fried Alligator Po' boy tasting session from the family. It's a good-time video filled with Southern hospitality.


If you don't know what a Po'boy sandwich is, just click here to see the New Orleans Po'boy Tour I shot last summer. A po'boy is the official sandwich of Louisiana. Any protein you can come up with has been stuffed into a locally baked roll of French bread. I've tried it with hot links, cold cuts, roast beef, and fried crawfish, catfish, oysters, and alligator. 

And in the South a sandwich is "dressed" -- that means adding slices of tomato, pickle, and lettuce with a smear of mayo. It's a Cajun version of the Subway sandwich.

Chef Matt makes a mean Fried Alligator Po'boy, and I'll take you through his easy step-by-step Southern cornmeal frying method. I love fried chicken done soul food style, which is made with a seasoned coating of flour while Dixie fried seafood is usually covered in cornmeal (or a cornmeal/flour combination.) 

I especially like catfish and fried oysters done this way, unlike L.A. Weekly food journalist Elina Shatkin, who differs in her review of a Fried Oyster Po'boy from The Gumbo Pot (click here). The Gumbo Pot also sells an Alligator Tail Fillet meal for a decent price of $10.75 (menu here.) In my view, cornmeal is a flavorful coating with an extra crunchy texture, when done right.

Chef Matt also does a buttermilk wash, before adding cut alligator cubes to the cornmeal. If you can't find buttermilk sold locally, a cheap substitution is done by adding a tablespoon of vinegar (or lemon juice) to a cup of regular milk and letting it sit for five minutes.

And since this Alligator Whisperer is in Louisiana, I'm sticking with local protein. That means I'm using $9.99 per pound fillets of alligator tail meat ! 

Gator is not for everyone, it can be a little chewy, with the texture of a well-done pork chop. The flavor is somewhere between chicken and fish. But I do have some cheaper substitutions that fry up just as deliciously.


The fried cornmeal coating also works well with budget one-dollar fish fillets of tilapia (which I frequently find at 99c only Stores, and in frozen meat grocery deli cases.) You could even use chunks of chicken fillets for a tasty cheap Fried Chicken Po'boy

If you ever visit Louisiana, I would recommend getting the more typical Fried Catfish Po'boy, which uses the same cornmeal coating and is sold for half the price of an alligator version.

In my South Los Angeles neighborhood, Southern transplants are catered to by local chain groceries selling catfish fillets in the fresh seafood section for around $3 per pound -- get a pound and you could easily fill three po' boys. You can use any locally harvested firm fish -- just try frying it in Chef Matt's seasoned cornmeal coating and making a po'boy sandwich with it.

With Spring around the corner, be sure to bookmark Chef Matt's Fried Alligator Po' boy recipe video for your first patio party of the year.  Even if you can't find alligator, or prefer not to use it, substituting fried catfish fillets will make the party a winner. 

Mardi Gras is in full swing in New Orleans (my belly-filling Crescent City Po' boy Video Tour is a click away, here) -- so join the celebration and cook up a po'boy with The 99 Cent Chef!

And check back to view my final recipe video of February Sandwich Month -- a homemade version of a breakfast corporate-tweaked classic, the Egg McMuffin -- done in this arty chef's animated stop-motion style.

Fried Alligator Po'boy - VIDEO
Play it here. Video runs 6 minutes, 57 seconds.

To view or embed from YouTube, click here.

Ingredients (2-3 six-inch sandwiches)
  • 1/2 pound alligator - or use tilapia fish or boneless chicken for a cheaper (and easier to get) substitution.
  • 1 cup buttermilk - or make your own by mixing regular milk with a tablespoon of vinegar or lemon juice, and letting the mixture sit for 5 minutes. It's okay to just use regular milk or even water -- just to dampen meat so cornmeal will stick.
  • 1 cup of cornmeal - white or yellow. You could also go with a mix of half flour, and half cornmeal.
  • Cornmeal is seasoned with  - 1 teaspoon of Cajun spices (I use Tony Chachere's, but any generic blend will do), garlic powder, and black pepper.
  • Large French bread baguette - cut into 6-inch sandwich sizes. Okay to use 6-inch bakery rolls from your local grocery.
  • The Sandwich is dressed in mayo, sliced tomato, pickle, and lettuce.
  • About 2 cups vegetable oil - for frying coated alligator (or any favorite frying oil).
 
Directions
Add oil for frying in a pan or pot, over medium/high heat.


Add buttermilk to a bowl and cornmeal to another bowl (or plate.) Season cornmeal with Cajun spices, garlic powder, and black pepper. Slice meat into bite-sized pieces. Add meat to buttermilk and wash all sides. Next, add wet alligator pieces to seasoned cornmeal and coat well.


You may need to fry in batches, depending on how large the pan or pot is. Carefully add a coated alligator nugget to the hot oil -- it should start frying and bubbling right away (see the video.)  Add more alligator, but don't overcrowd the frying pan. If you use fish fillets they will cook quicker; no more than a couple of minutes for each side. Alligator takes an extra minute or two longer, about 5 -7 minutes. Done when cooked through and the cornmeal coating is brown.


Remove pieces to a paper towel to drain, until all the alligator is fried.

Now it's time to build the sandwich. Cut French bread baguette into 6-inch sandwich sizes. Slice open roll and add mayo, sliced tomato, and lettuce (pickle slices, too.) Fill it up with fried alligator nuggets. Best with a cold beer!

Monday, February 13, 2012

Falafel Pita Sandwich

I'm not a falafel expert, even though I lived in the Little Armenia enclave of East Hollywood, and visited my share of their eateries and Mom and Pop grocery deli counters. I usually kept my menu selections of  Middle Eastern fare to kebobs, shawarmas, gyros and roasted chicken from Zankou's. Maybe it was spying those dried-looking fried spheres of ground chickpeas under heat lamps that made me skittish to place an order for falafel?

 But after trying this recipe, I am a convert. For this second entree in my February Month of Sandwiches series, I made a vegetarian sammy of homemade Falafel. Man, it turned out great -- so soft and tender on the inside, yet crunchy on the outside - these fried discs of nutty ground garbanzos, flecked with green parsley and pungent onion, garlic and cumin will be in a starring role at our next gathering (Oscar party?) for sure!


You can cook them ahead of time - it only takes 10-15 seconds of microwaving to bring them back steaming (although they are perfectly good at room temperature.) But hot off the stove top and stuffed into a pita - along with my creamy, chunky Cucumber, Yogurt and Honey Relish - is the best way to go.


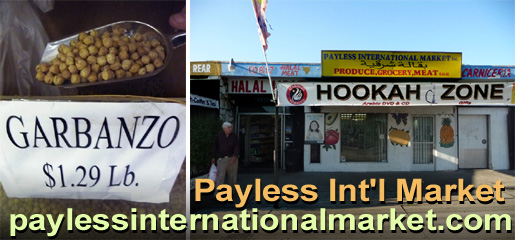
And of course, all the falafel ingredients are inexpensive -- just the way this Cheapie de Cuisine likes it. I go to a Persian market (Payless International Market) a couple of miles away on Venice Boulevard that stocks dried garbanzo (chickpeas) for $1.29 per pound. I got 2 cups of dried beans for less than a dollar -- and for some reason, checkout only charged me 99 cents per pound - score! You could always use cheap canned (and drained) garbanzo beans or chickpeas. One of my commenters roasted canned cooked garbanzos to firm them up (about 15 minutes at 350 degrees?)

 I have a parsley bush that is producing overtime, and my local Latin market also sells one bunch for less than a dollar. Onions and garlic are cheap, and a small jar of ground cumin is always in my pantry ready to be used for my forays into Western Asian cuisine.

The Falafel directions below seem long, but this entree is simple to make, once the garbanzos are soaked overnight. All you are doing is some rough veggie chopping; a quick blending of the beans and veggies; and frying the falafel patties for 2 minutes on each side. Because the falafel orbs are small, a little extra time is needed to cook them all up (about 20 balls) -- it may take 3 or 4 frying batches, depending how big the pan you use is.

A Falafel Pita Sandwich can be dressed with lettuce and tomato. Middle Eastern eateries often serve Falafel with hummus (my recipe here) or a tahini (mild peanut butter tasting) sauce. I thought a cool and creamy Cucumber, Yogurt and Honey Relish would contrast nicely with hot and crunchy fried orbs of falafel.


Cucumbers and yogurt are cheap, of course, and I always have a half dried-out jar of honey laying around. The relish ingredients combine deliciously -- creamy plain yogurt is very sour, but a tablespoon of microwave-reconstituted honey (or your favorite sweetener) dulls that too-sharp edge. This relish couldn't be easier to make: just julienne half a cucumber and mix it all together. Sweet, crunchy, creamy and fresh.

Because I made a double-sized quantity of falafel, I'm taking some into work today. I'll let you know how they go over (who am I kidding? They're sure to be a hit!) If you want to lower the carb count, leave out the pita -- a plate of falafels with my Cucumber, Yogurt and Honey Relish is good on its own.

Ingredients for Falafel (about 20 small falafel balls, enough for 4-5 sandwiches)
  • 1 cup dried garbanzo (chickpea) beans - soak overnight. Double all the ingredients and you have enough for a Falafel Office Party!
  • 1/2 bunch of parsley - roughly chopped.
  • 1 whole onion - small, roughly chopped.
  • 2 teaspoons of chopped garlic - fresh or from jar.
  • 1 tablespoon of baking powder
  • 1 tablespoon cumin
  • 1 tablespoon lemon juice - fresh or from plastic. Okay to use lime juice.
  • Salt and pepper to taste - optional. I made my falafel balls without salt and pepper this time and thought they tasted fine.
  • 2 cups vegetable oil for frying

Ingredients for Cucumber, Yogurt and Honey Relish (or dip)
  • 1/2 medium sized cucumber - juilienned (thinly sliced.)
  • 1 container plain yogurt - about 6 ounces.
  • 1 tablespoon of honey - or any sweetener, to taste. Just enough to take out some yogurt sourness.


Directions for Cucumber, Yogurt and Honey Relish
Slice 1/2 of a cucumber into thin coins. Stack a few coins at a time then slice them into thin strips. Repeat stacking and slicing cucumber coins until done.


Add yogurt, julienned cucumber and one tablespoon of honey (or favorite sweetener) into a bowl. Mix well and set in refrigerator until falafels are cooked. Cucumbers tend to sweat out some liquid - so just before serving you may have to pour out the liquid that settles into pockets across the top of the dip. Give it quick stir and serve.


Directions for Falafel
Soak 1 cup of dried garbanzo beans in about 3 cups of water overnight (about 8 - 12 hours). Chickpeas should double in size when ready - so you get about 2 cups of soft beans when plumped up. Drain and add to a large bowl.


Roughly chop 1/2 bunch of parsley. You have leeway here. I've seen recipes range from calling for at least few sprigs, to much more. Chop onion into small enough chunks to fit into a blender or food processor.


Add parsley, onions and chopped garlic to the bowl of drained garbanzo beans. Next, pour in a tablespoon of lemon juice, and sprinkle on a tablespoon of baking powder. Salt and pepper to taste - optional. Mix ingredients well.


Into a blender or food processor, add falafel mixture in small batches. Pulse the mixer until you get the consistency of damp oatmeal -- roughly chopped, but not pureed like peanut butter.

Empty processed falafel mixture to a bowl and repeat until all the garbanzo bean mixture is finely chopped. (You can make the mixture ahead of time and keep it in the refrigerator, until you are ready to form the falafel balls for frying.)


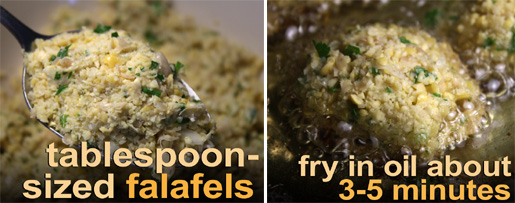
Now it's time to fry the falafel balls. Add 2 cups of oil to a pan or pot over a medium heat. If you have a deep fryer you can use that. You will fry them in batches, depending how large your pan is. I make the falafels tablespoon-sized. Just scoop up a heaping spoonful and pat it lightly on the tablespoon -- to form a roundish disc. Using your fingers, gently slide off falafel ball into the oil. Be careful adding the first falafel balls, as oil may splatter.


Some of the falafel balls may break, but that's okay, you will get better at it the more times you slide them into the oil. They are delicate, but will hold together fine once one side browns. Watch the falafel edges along the bottom and look for a nice brown crust edge to form. It only takes a couple of minutes for each side to brown. (If you are having too much trouble with breaking falafel balls, try refrigerating the falafel mixture for a few hours first, to firm it all up.)

Gently turn falafel ball over. I used a fork (or thin spatula) to loosen the falafel from the pan, and a butter knife, or spoon, to help flip them over. At this point you can let the falafel ball stay round for a moist and soft center, or you can press them down a little bit, to cook them all the way through. It's up to you how well done you like them.


Brown each side. You are looking for a dark, almost chocolate brown, but be careful not to burn them. Once they are browning you can turn them over a few times to reach desired color. When done, set aside on a rack with paper towels to drain.

Now you're ready to assemble a Falafel Pita Sandwich. I like to microwave a round of pita bread for a few seconds, so it slices and opens easily (you can also heat it in a toaster for a minute.) Slice a pita bread in half and scoop in some Cucumber, Yogurt and Honey Relish, then load in some falafel balls - I got about three falafels per pita. Be careful with the first bite, as the falafel balls retain their heat!


Hindsight
For my recipe research, I noticed that a couple of teaspoons of flour is a common ingredient, but I left it out. Maybe it helps hold the orbs together, but I didn't want the flour flavor this time  -- you could add it to help bind the falafels and keep them from breaking up, if you want to. Another interesting ingredient left out was the minty cool herb, cilantro. I would definitely try this next time, but thought, for my first foray, it might overpower the lighter parsley taste.

You could also make the falafel orbs larger than a tablespoon; say twice as big -- golf ball sized. Use an ice cream scooper to size them, or a large serving spoon. Refrigerating the falafel mix for a few hours first, will help hold them together when forming larger balls for frying.

For convenience, a couple of cups of drained canned garbanzo, or chickpeas, can be used in this recipe. But you'll lose some of the nutty texture and flavor of more solid, fresh soaked, garbanzo beans. Canned beans are mushier, but almost taste the same. It also takes less blending time, as canned beans are fully cooked through. As mentioned above, one of my commenters roasted canned cooked garbanzos to firm them up (about 15 minutes at 350 degrees?)


When frying the falafels some ground garbanzo pieces will break off into the oil, so have a spoon (slotted is best) to fish out the blackening pieces each time you add a new batch of falafel discs. Add frying oil as needed. You won't need to add extra if you have a deep fryer -- I kept the oil about an inch deep during the cooking.

You could try a less oily version by baking the formed falafels in the oven -- 350 degrees until browned and done, about 20 - 30 minutes. But, of course, frying is the best way to go -- it's like comparing French fries to baked fries.

I originally made this recipe with 2 cups of dried garbanzo beans and ended up with a large tubful of ground falafel mixture -- enough to feed a party! So the recipe above is half of my original tryout. I'm sure you could freeze any leftover mixture, or just keep it in the refrigerator for a few days to cook up later.

A great thing about fried falafels is they heat up in the microwave quickly. It only takes 10 - 15 seconds to bring them back to steaming hot. But do be careful with your first bite -- as these orbs are excellent heat conductors. To keep the extra crunchy exterior you can bake at 350 degrees for about 5 minutes to reheat.

Tuesday, February 7, 2012

Restaurant Nocturnes VIII - Sandwich Edition, VIDEO

This miserly epicurean is changing into a culinary artist this week. Sandwiches are in my price point, and I'm happy to share my nighttime exploration of LA eateries captured in the latest Restaurant Nocturnes VIII - Sandwich Edition.


My noir-loving camera captures bricks and mortars that specialize in sandwich-slinging all over Los Angeles, from the Westside, where Top Chef's tattooed winner Michael Voltaggio has opened ink.sack, to the East L.A. home of mom-and-pop Mexican Cemitas shops and Torta master builders.

Looking for the best and cheapest Cuban Sandwich in town? I've got it right here -- Porto's Bakery and Cafe in Glendale. The line may be long, but, boy is the wait worth it. A toasted bakery-fresh bread roll is loaded with succulent roasted pork, smokey ham, Swiss cheese, mayo, and sour mustard, with tangy slices of pickle -- hot-pressed and grilled, all for $4.85 (plus tax.)


In downtown L.A., there's a battle over the early 20th century origins of the French Dip Sandwich. Was a French roll first soaked in beef au jus at Philippe The Original on Alameda Boulevard, or at Cole's on 6th Street? Both claim it -- but who cares, as long as they keep making them like it's 1918. Listen in as a Cole's waitress gives this cheapest culinarian the lowdown on Cole's $5 Half Dip with Fries Happy Hour.


Any homesick transplanted  Southerners out there craving smoked meat? Check out my footage of Bludso's BBQ restaurant on Long Beach Boulevard in Compton, where you get perfect Texan-style pit smoked brisket -- tender and juicy slices of beef with a red smoke ring just under the crunchy skin. Order the Sliced Brisket as a sandwich and you get about a third of a pound of beef.  It's like a starkly minimalist Franz Kline  expressionist masterpiece between two slices of white bread. Plain and simple for the incredibly low price of $4.50 (plus tax). Get the sauce on the side so you can drip it on like Jackson Pollock.


I wonder if L.A. first cooked up the $10+ burger? I've yet to buy one on principle, but I've made an exception here, to feature the protein patties of lauded chefs Nancy Silverton and Amy Pressman's Short Order restaurant. Located in the historic Farmers Market at Fairfax Ave. and 3rd St., this newly built shrine to ground bovine, swine and poultry is jam-packed on weekends. Too expensive for me, but if you are visiting with an expense account, it's worth checking out.


After a wallet- emptying $13 Nancy's Backyard Burger from Short Order, I finish my nighttime tour with a $2 Vietnamese Banh Mi from Buu Dien, located on Broadway Boulevard at the end of a Chinatown mini-mall. The French invaded Vietnam before we did, and the only good thing to come out of all the war-mongering is this Asian/French sandwich mash-up: the Banh Mi.(I wonder, with our fiascos in Iraq and Afghanistan, could a Falafel Burger with Cheese soon sweep through the Middle East?) A Banh Mi features improbable combinations of pate and cilantro; sweety pickled sliced veggies (carrots, daikon, cucumber) and head cheese; thin jalapeno slices and roasted pork. Try it once and you will be back, especially for two bucks a baguette!


So fasten your seat belt and let The 99 Cent Chef guide you through neon- washed L.A. to witness the sights and sounds of 13 sandwich makers captured during my night-time rambles through our storied streets. Under the  video presentation below, you'll also find a list, with links, of the featured restaurants in order of appearance.

Restaurant Nocturnes - Sandwich Edition - VIDEO
Play it here. Video runs 6 minutes, 17 seconds.

To view or embed from YouTube, click here.

Click on any name to go to restaurant website or review.
1. ink.sack     2. the Spice Table     3. Bludso's BBQ    4. Cemitas Poblanas Elviita
5. Tortas Las Nuevas     6. Cole's     7. Short Order     8. Canter's 
9. Porto's Bakery and Cafe     10. The Hat     11. Falafel Arax    
12. Wurstkuche     13. Buu Dien

To see more Restaurant Nocturnes, just click on a name:
Restaurant Nocturnes I, Restaurant Nocturnes II, Restaurant Nocturnes III, Restaurant Nocturnes IV, Restaurant Nocturnes V, Restaurant Nocturnes VI, Restaurant Nocturnes VII.

Wednesday, February 1, 2012

Patty Melt VIDEO - Sandwich Month

It's sammy month at the chintzy chateau -- and The 99 Cent Chef has your seat saved at the head of my dining table. Do you like rye, sourdough, pita, or multi-grain? Should I make it toasted, open-faced, or plain; or are you one of those who like their bread edges sliced off? As for what goes on between two slices of bread, well let's just say the variations are endless.

Looking back on my food blog, I've done my share of sammy construction, just click on any name to see them. Scallop Roll, Picnic Sandwiches with Amy Mann, a Big Easy Po' Boy Tour, Meatball Sub, Pita with Scrambled Eggs, Vietnamese Bahn Mi, Muffaletta, Salmon Schmear, Veggie Wrap, Salmon and Portabella Mushroom Burgers, Grilled 3 Cheese, and a Cuban Sandwich. Plus, for Super Bowl Sunday any of these sandwiches will keep the cheerleading section happy.

For the month of February, I have a chalkboard menu of sandwich videos and recipes, including crunchy spheres of herb-infused Falafels in Pita Bread; a homemade version of the classic McDonalds Egg McMuffin; a special sandwich edition of Restaurant Nocturnes; a way out Alligator Po' Boy by my Cajun nephew Chef Matt, and right now, a decadent and luscious Patty Melt.


I think the first time I tried one was from a street corner food truck. After scarfing one down, this is one lunchtime nap inducer. Although Patty Melts seems to have fallen out of favor lately. (I used to see them on every hamburger joint's menu.) Maybe they are seen as just too plain with the advent of the $12 burger (which, on principle, I have refused to shell out for!)


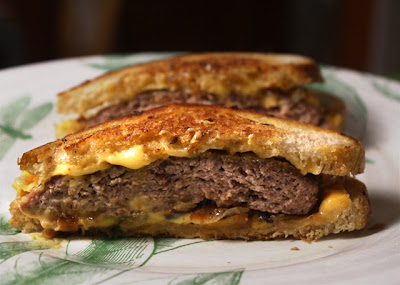
Most sandwiches have crunchy, healthy lettuce, cucumber, pickles, and/or tomato to offset the protein and carbs; however, in a Patty Melt, there is no pretense. This sandwich cuts right to the chase, just carbs, meat, and oozing cheese -- even the onions are cooked down to a sweet caramelization.


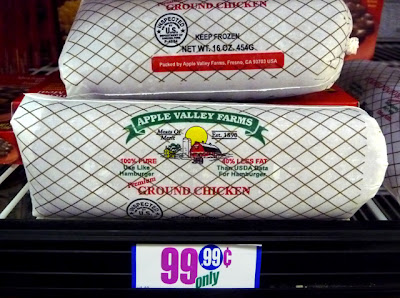
For my take on the Patty Melt, ground hamburger is too expensive, so I used ground chicken instead. Most grocery store frozen deli cases stock ground chicken and turkey for a little over a dollar a pound. I got mine at the local 99c only Store. So for this calorie bomb of a sandwich, ground poultry has less fat -- it's a lighter way to go.

I have a slew of sandwich orders to get in, so place your order now, and check back soon. And in the meantime, check out my Patty Melt recipe video below -- warning may induce drooling!

Patty Melt Recipe - VIDEO

Play it here. Video runs 2 minutes, 55 seconds.

To view or embed from YouTube, click here.
 
 Ingredients
  • 1/3 pound of ground meat - per hamburger patty. I used ground chicken, but turkey or ground beef is okay.
  • 1 whole onion - small to medium.
  • 2 slices of bread - Normally rye bread is used for a Patty Melt, but you can use any type of bread (or buns) you like.
  • American cheese - 2 slices. Again, if you have a favorite (like cheddar or Swiss) go ahead and try it out.
  • 1 tablespoon of butter - for toasting bread in the pan.
  • 1 tablespoon of cooking oil - for caramelizing the onions.
  • Salt and pepper to taste.


Directions
Since caramelizing onions takes the longest, start with that. If you use a larger pan the onions will brown quicker. First slice and/or cube-cut the onions. Don't worry about the size of the pieces, they will cook down considerably.


Add 1 tablespoon of oil to a medium hot frying pan. Add chopped onions and stir around for a couple of minutes. Now you can sit back and let them lightly brown. It will take a while but the flavor of sweetened caramelized onion is worth it. You need to still stir around the onions every once and a while, so they don't blacken and burn. This process takes 10 - 15 minutes.

If you are making a few Patty Melts, then you can brown several chopped onions at once -- you may want to do a few onions anyway, as caramelized onions are good on almost any grilled sandwich (including a simple Grilled Cheese, or as the base to French Onion Soup, recipe here.) It's also okay to make caramelized onions ahead of time, just store them in the refrigerator until you need them. When onions are done, set aside.


Next, form a meat patty (or patties) that is slightly larger than the bread slice. Depending on the water or fat content of the ground meat, the patty will shrink. I got three patties from one pound of ground chicken.

Add one tablespoon of oil to a frying pan, over medium heat. Add patty and season with salt and pepper. Brown each side of the patty, until done. If you are cooking ground poultry then cook it all the way, until juices run clear when pierced with a knife. For ground beef, you can cook it the way you normally like it (medium to well done.)


Now time to put it all together. You may need to clean out your frying pan to start fresh. Add a tablespoon of butter (or your favorite substitute) to a medium heating pan. Coat the bottom of the pan so the butter will coat the bread slice.

Add one slice of bread, a slice of cheese, meat patty then top with caramelized onions and one more cheese slice. Top it all off with the last bread slice.


Your Patty Melt is built and now just brown each side as you would a typical grilled cheese sandwich. It only takes 5 minutes or so. Watch as the cheese melts and mixes with the caramelized onions -- my cheapie Patty Melt is one decadently tasty sammy!


Related Posts Plugin for WordPress, Blogger...