Tuesday, March 27, 2012

Delicatessen Coleslaw

I like coleslaw on my deli sandwiches. It adds a cool crunch to a sliced stack of cured protein between rye bread. And deli's know how to make a great coleslaw.

I grew up eating Southern style Slaw -- super creamy from all the extra mayo. A Deli Coleslaw uses half the amount of mayo, and it's the better for it. They also add a little olive oil and vinegar, with a hint of sugar. It's lighter that way, but still luscious.

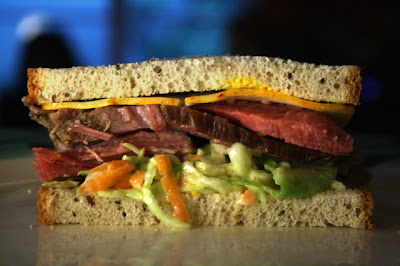
Last week I showed you how to make Homemade Deli-Style Corned Beef here, and now you will have the perfect accompaniment -- cool Delicatessen Coleslaw on the side, or load it into any favorite sandwich.


Cabbage is always cheap, I got mine on sale during St. Patrick's holiday week. For my recipe I used 1/2 a head, but you can easily double the recipe ingredients to use it all. (I boiled the other half  - adding a couple cups of broth from my Homemade Corned Beef recipe.)

If you want a simpler typical Coleslaw, the ingredient list is even shorter, just cabbage, black pepper and mayo.

My Delicatessen Coleslaw is perfect for your next sandwich (it doesn't have to be Corned Beef) or as a light side. It's wife approved, so I know you will like it.


Ingredients (3 - 4 servings as a side - many more for sandwiches)
  • 1 carrot - peeled and shredded. Okay to use 1 cup pre-shredded. I used small peeled carrots with my metal box grater (large-course shredding side.)
  • 1/2 white cabbage - shredded. I used the mandolin slicing side. Okay to slice by hand.
  • 3 tablespoons mayonnaise - light or regular strength.
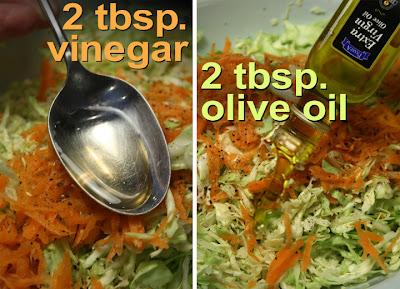
  • 2 tablespoons olive oil - or good tasting vegetable oil.
  • 2 tablespoons vinegar - white, rice or cider.
  • 1/2 packet of sugar substitute - Optional. Okay to use 1 teaspoon regular sugar or your favorite sweetener.
  • Black Pepper - I add salt when serving. Adding salt causes cabbage to sweat and that breaks down the mayo, so best not to use any salt. Okay to sprinkle on a little salt over each serving though.


    Directions
    Shred or fine chop 1 carrot. I used the largest shredding hole side. Shred or fine chop 1/2 head of cabbage (cut out tough stalk end, and discard.)  I used the mandolin slicing-blade side of my metal veggie shredder.

    Add shredded cabbage and carrot to a large bowl. Of course, be careful using a box shredder - it's easy to take off a fingertip! When you have just a sliver of carrot or cabbage left, chop it up with a knife.


    Add mayo, oil, vinegar and sweetener. Season with pepper to taste and mix well.


    Cover and refrigerate for an hour, or go ahead and serve at room temperature.

    Hindsight
    You might as well use a whole head of cabbage - just double all the other ingredients. This recipe is so good that you won't have much leftovers anyway.

    I first tried the recipe without sugar - that first bite was too sour because of the vinegar, so I added a small amount of sugar to take the edge off. You can make my Deli Coleslaw without sugar as well, or add as little as you want.

    For a lighter slaw use one tablespoon of olive oil, instead of two. You can also add more mayo for a creamier version -- try an extra tablespoon.

    Each day the Coleslaw is in the refrigerator, the mayo will breakdown some and become watery. You can drain liquid from Coleslaw and add a tablespoon of mayo at a time, to bring back desired creaminess.

    And remember not to add salt to Coleslaw or it will break down the mayo and it will be watery. If you want salt then add it when serving.

    The simplest easy Coleslaw is just cabbage, black pepper and mayo, that's it.

    Wednesday, March 21, 2012

    Homemade Deli-Style Corned Beef Sandwich

    If you followed my tweets during St. Patty's week, you've read about and seen photos of: $1.27 cent per pound corned beef on sale at Von's market; whole heads of cabbage (for a deli-style coleslaw) at 3 pounds for a dollar from Ralphs grocery; my week of brining the whole beef brisket; and you also know the outcome of my attempt to make a Homemade Deli-Style Corned Beef Sandwich. You can call it an Irish/Kosher holiday meal by way of Twitter (click here.)


    Normal boiled corned beef for St. Patrick's Day is delicious, but New York deli-style is a great way to go, too. Anyone can make it -- and you get a huge hunk of meat for way less than the price of a $11.75 Corned Beef Sandwich at Canter's Deli (their menu here.) I bought a 2.67-pound slab of beef for $3.39. It's enough, when cooked and sliced, for three huge Corned Beef Sandwiches. That's a great deal; more than 99 cents per sammy, but not by much.

    When you buy a corned beef from the market it is ready to cook. Just add the packet of herbs that come with it, and
    boil the beef for 4 hours; allow it to cool down; then slice and stack it between two pieces of bread. I like to add mustard, cheese and coleslaw to my deli sandwich, how about you?

    If you are as cheap as me, you will have stocked up on the Irish holiday corned beef sales. Not even the biggest BBQ day of the year, the 4th of July, has such a good deal on beef  (even hamburger was at least $2.89 per pound, if I remember last year's prices right). I got one brisket to cook and three more for the freezer -- check back, as I have plans to make a Texas style BBQ brisket with one of them this summer. (My neighbors have a small smoker they said I could borrow.)

    Back to Homemade Deli-Style Corned Beef Sandwiches -- I wanted to try something different with the on-sale beef brisket. I feel priced-out of regular deli dining these days, with sandwiches in the $10 plus range. My favorite deli sandwich is a Corned Beef on Rye with Coleslaw (slaw on the sandwich, not as a side.) It's cool and crunchy, plus meaty and rich, but too much of a good thing. So, by making it at home I can control the amount of meat that a typical deli over-loads between two slices of bread -- and I can scoop as much coleslaw into the sandwich as I want.

    If you only have access to plain beef brisket then try corning the beef yourself a couple of ways with salt: either by a "dry rub" mix, or by totally submerging the beef in a bath of salt, also known as brining.

    To get that supple and moist texture of typical deli meat, brining is best. Also, spices and sugar are mixed into the brine solution for extra flavor. For my deli corned beef I'm using spices you may already have on hand -- and if you don't, that's okay; just use what you got, it will still be delicious. The main ingredients for corning the beef are salt and sugar.


    The only thing to watch out for is an over-salty corned beef. The brisket needs to brine/soak for about five days in the refrigerator. When you are ready to cook it, give the corned beef a good rinse. Next, place the brisket in a pot and cover it with water. Bring to a low boil and cook 10 minutes or so, to leech out most of the salt. Finally, change out the water one last time and it's ready for slow simmering.

    It's pretty simple really -- just make the brine, leave the beef to soak a few days in the refrigerator, and finally let it slow cook for a few hours. Scroll down to Hindsight to see my brining method directions.

    You'll also want a batch of your favorite coleslaw to go along with my Homemade Deli-Style Corned Beef Sandwich. And, if you want a real deli coleslaw recipe, then just click here. I've got one so good your guests will ask if are moonlighting at Canter's Deli, while checking out your legs, looking for those waitress's sensible shoes and granny stockings!

    This cheapest of chefs knows all about local sandwich makers -- just check out my Los Angeles Sandwich Video Tour from last month, here. And, below is a another flashback video I shot in 2008 of Canter's Delicatessan's 60th anniversary. For that day only, Corned Beef Sandwiches cost 60 cents! My friend Drew and I were all over that deal. Even though there was a "one sandwich per customer limit," the incorrigible 99 Cent Chintzy Chef found a way around that roadblock - just watch the video to see how I did it.

    And at the end of this post I also provided a Quickie Corned Beef Version for your convenience.

    Canter's Deli's 60 Cent Corned Beef Sandwich - VIDEO 
    Play it here. Video runs 1 minutes, 45 seconds.

    To view or embed from YouTube, click here.

    Ingredients using Corned Beef
    • 1 whole corned beef - from your local supermarket or deli. They usually weigh 4 to 5 pounds.
    • Water - enough to cover brisket.
    • 1 whole chopped carrot - optional
    • 1 whole chopped onion - optional
    • 1 tablespoon chopped garlic - fresh or from jar.
    • 1 bay leaf 
    • Packet of herbs that come with corned beef.

    Add enough fresh water to cover the brisket by an inch. Add the chopped veggies and bay leaf. Bring up the water to a boil, then lower the heat for a low simmer, cover the pot and cook for about 4 hours.


    Check every hour or so to make sure the broth does not cook out. Add a 1/4 cup of water at a time, if needed. That's it -- just remove the corned beef and let it cool down enough to slice and serve.


    For an oven version, add the veggies, then cover and bake in the oven at 350 degrees for 3 hours. Finally, remove the cover and finish baking another hour -- this will give a nice dark brown color to the outside of the meat.

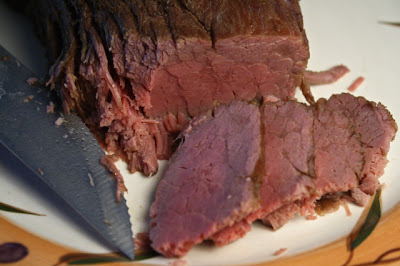
    When slicing the corned beef for sandwiches make sure to cut across the grain of the meat. Of course, you'll want to try out a slice to see how yummy it is. Notice how compact the meat is and its rosy color inside. It may still taste a little salty, but that's normal.


    For a Deli-style Corned Beef Sandwich just add mustard to rye bread. Layer on your favorite cheese, corned beef and coleslaw. From a 2.67 pound of corned beef brisket, I made 3 sandwiches. I served them to my wife, mother-in-law and our neighbor Deb -- they all raved how delicious it was. I hope you will like it too!


    Hindsight
     Ingredients for Brining Corned Beef
    • 1/2 cup of salt - some recipes use for pink curing salt, which keeps the meat pink.
    • 1/2 cup of brown sugar - okay to use regular sugar, or a favorite sweetener like honey.
    • 1 tablespoon of peppercorns - or regular black pepper.
    • 1 tablespoon powdered ginger - or fresh chopped.
    • 1 tablespoon garlic powder - also, chopped fresh or from jar.
    • 1 tablespoon ground paprika
    • 1 teaspoon ground, or whole, cloves
    • 2 whole bay leaves - crumbled. Or other favorite dried herb.
    • 4 cups of water - or enough to cover brisket.
    • Container and one large Ziplock bag to hold brisket and brine/marinade.
    • I also added the spice packet from the packaged Corned Beef - optional.
    * It's okay to leave out any spices you don't have - it's mainly about brining with sugar and salt.


    Directions for Brining
    Heat water in a pot until it starts to simmer. Mix in sugar and salt and stir until it all dissolves - should only take 2 to 4 minutes. Add all the spices and bay leaves. (I also opened the corned beef package and poured in the spice packet that comes with it - optional.) Mix well and turn off heat. It needs to cool down to room temperature. You can add some ice cubes to speed it up, or just come back in half an hour.


    Remove the brisket and rinse it off. I used a large freezer plastic bag for brining. Add the brisket to the plastic bag and add enough cooled brine liquid to cover the meat, then seal it. You could also use a large plastic, ceramic, or glass container with a cover. I then placed the bag of brine and brisket into a plastic container, in case the bag accidentally opens during the 5 days of brining in the refrigerator.


    After a couple of days, I turned the plastic bag over, so all sides of the brisket get enough brining solution. After 5 days it's time to cook the corned beef.


    Directions for Cooking home cured Corned Beef
    First, dump the brine and rinse off the brisket. Add the brisket into a large pot and pour in enough water to cover the meat. Bring to a low boil and cook for about 10-15 minutes. This will leech out most of the salt. Pour out the salty water.

     Now you can follow the cooking directions above.

    Friday, March 16, 2012

    A Delicious $1 Gumbo in Los Angeles - VIDEO Review

    Yep you read right. And I found it quite by accident at a local fast food joint called Cajun's Fabulous Fried Chicken. If you don't believe me just check out my video visit at the end of this post.

    I'm a fried chicken fanatic, so living in South LA, I'm in nirvana -- where there are soul food restaurants and fried chicken fast food citadels on almost every corner. Now I don't eat fried poultry all the time, but I do have a weak spot for a "2 Pieces for 99 Cents Tuesday Special" from the local Popeye's Fried Chicken outlet. (Be sure to check-out my Popeye's excursion in "My 99 Cent Dinner With Nuno" video, to see what a typical Tuesday is like - just click here.)


    Where there is fried chicken there are tasty sides. Popeye's has a delicious Dirty Rice, M & M's Soul Food makes the best Corn Muffins, Roscoe's has waffles, and Cajun's Fabulous Fried Chicken has an eight ounce serving of Gumbo for a dollar (plus tax.) It's an incredible deal that I have to try every time I drive by. And fortunately it's only a mile away in a mini-mall, on the corner of Martin Luther King Jr. Boulevard and Coliseum Street (for a map click here.) I first stopped there to try their fried chicken (which is quite good) and spied a "Gumbo for $1" sign. It's well within my price range and what's to lose? It is an 8 ounce serving in a Styrofoam container that they give you in a brown paper bag, along with a white plastic spoon, paper napkins, and a packet with two saltine crackers.


    Since there was no seating I retired to the parking lot and onto my front car seat, turned on 90.7 FM's Reggae Central, and dug in. They serve it pipping hot, so I couldn't wolf it down, thus allowing time for savoring. As I scooped and stirred the contents around, I was surprised how substantial it was. It's only 8 ounces, but it's loaded: huge pieces of chicken, in a broth filled with veggies and rice -- there's even a few small bay shrimp and thin slices of what appears to be real Cajun Andouille sausage, which gives the broth a rich complex flavor.


    The broth is tomato based and is very spicy - so this is best paired with a cold beverage like beer or ice tea. The chicken is mostly white meat, and the veggies are chunky bits of bell pepper, carrot, onion and celery. On the bottom is white rice -- it's a very hearty Gumbo. Everything I like is in it, except one thing.

    All the ingredients work well together. My only complaint is calling it Gumbo, it's more of a light tasting tomato stew. I know Gumbo, just click here to see a video of my Mom's homemade recipe. A typical gumbo starts off with a dark brown Roux (cooked flour) as the base, so you get a slight nutty and flour/gravy flavor - this $1 Gumbo is missing it -- or has very little. But I'm being picky, it really is a fabulous find.

    So if you are ever in the 'hood and want a deliciously cheap quick to-go, give Cajun's Fabulous Fried Chicken's $1 Gumbo a try, and tell them The 99 Cent Chef sent you. I can also recommend their fried chicken. And for all you out-of-towners, just check out my video below to see what I'm talking about.

    If anyone else has an incredible dining deal around where you live, leave a comment and let everyone know.  I'll make a note of it, and if ever I'm in your area I'll be sure to drop by sometime!

    $1 Gumbo in Los Angeles - VIDEO

    Play it here. Video runs 2 minutes, 53 seconds.

    To view or embed from YouTube, click here

    Address: 4501 Martin Luther King Jr. Blvd.
    Los Angeles, California 90016
    phone: 323) 290-0001
    For map click here.

    99 thanks to Cajuns Fabulous Fried Chicken and the chefs!

    Regular Menu - There are other specials too!

    Sunday, March 11, 2012

    Sardines in Tomato Sauce with Olive Oil over Pasta - Video Recipe

    In soybean, olive, or sunflower oil - lightly smoked, brined, skippered, and tomato sauced - there is more to canned fish than tuna in plain water. 

    I always find small canned fillets cheaply at my local 99c only Store and Dollar Tree including herring, sardine, mackerel, and anchovy. In my cupboard, you will see all of these. And, the tastiest way I've found to use tinned gill-bearing aquatic vertebrates, is sauteed in olive oil and paired with pasta.


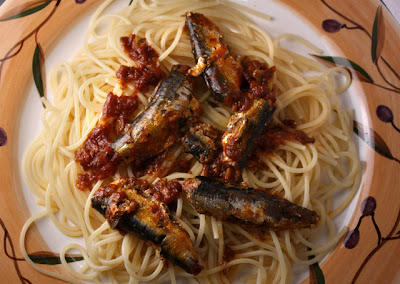
    Usually in packages smaller than cans of tuna, anywhere from 2 - 4 ounces, these fat finger-sized fillets of fish are perfect for a single after-work dinner serving. Sardines in Tomato Sauce with Olive Oil over Spaghetti is my latest budget entree. It's quick and easy to prepare, and most of all, delectable. What more could you ask for from the fugal Blogger du Cuisine.


    This recipe is influenced by our local Queen of Pizza, Nancy Silverton, co-owner/chef (with Maria Batali) of the always-crowded Mozza Pizzeria. She wrote a book a few years ago called "A Twist of the Wrist," where she created a host of entrees using canned and jarred edibles. I'm too cheap to buy the book, but I check it out from my local library when I need inspiration. While this dish is not in it, I like to think she would approve.


    If canned sardines come in oil, all you have to do is pour it into a skillet, oil and all, heat through, then add it over freshly cooked pasta. The sardines I used for this recipe came packed in tomato sauce. I could have heated it in the same way, but thought pouring in a couple tablespoons of olive oil would add just the right amount of richness.


    I have a friend who hates the taste of fish (he's an official 99 Cent Player and featured in my video here) -- he doesn't know what he is missing. However, I do understand the apprehension of using canned fish. Fish is always marketed as freshly caught, frozen fresh, or farm-raised. That's the best way to get it. While canned tuna is what almost everyone is familiar with; I wanted to try a different tinned protein and found this recipe preparation the best -- especially when I can get it all at the right price!


    So next time you run across canned fish on sale, stock up -- and give my Sardines in Tomato Sauce with Olive Oil over Spaghetti a try. It's certainly cheap enough, quick to do, and a tasty change of pace.


    Sardines in Tomato Sauce with Olive Oil over Pasta - Video
    Play it here. The video runs 2 minutes, 50 seconds.

    My YouTube video link for viewing or embedding, just click here.

    Ingredients (1 serving)
    • 1/4 to 1/3 package pasta - I used spaghetti, but you could use any type you have on hand.
    • 1 can of fish - a 2 to 4-ounce can. I used a 3.75-ounce tin of Sardines in Tomato Sauce.
    • 2 tablespoons of olive oil - okay to leave out oil for a lite version. If you are using canned fish in oil, then use that oil instead of adding olive oil.
    • 2 tablespoons of dried (or fresh grated) parmesan - optional. To add when serving.
    • Water for boiling pasta

    Directions
    Start pasta boiling in a pot of water according to package directions. I usually shave off a minute or two of cooking time for al dente pasta. Since this recipe is for a single serving, I use a third of a package of pasta (about 6 ounces.) You can add more pasta if you want to.


    In a skillet add olive oil and the can of fish. I've made versions without adding extra oil, too. In the above video, my can of Sardines in Tomato Sauce has olive oil.

    You only need to heat up the fish in oil and tomato sauce for about about 2 minutes, over low/medium heat. When fish, oil, and tomato sauce start to simmer, turn it down to the lowest heat.

    If the tomato sauce cooks down too much then add a tablespoon or two of water to have more sauce.


    Pasta should finish cooking in about the time the fish with sauce is heated through. Put drained pasta on a plate and top it with the fish, oil, and tomato sauce. The fish is delicate because it is already cooked so carefully add it last -- so it doesn't shred into unrecognizable flakes (unless you are squeamish looking at whole fish.) Finally top with dried or freshly shaved parmesan cheese (optional.)


    Hindsight
    This pasta dish is delish with almost any tinned fish you find on sale, except salted anchovies. (They have typically used one or two fillets at a time to flavor a pasta sauce.) If the fish is stored in oil, then try it with just that -- kind of like my John Cassavetes Red Pepper, Garlic, and Olive Oil with Pasta (click here to see my recipe.) If you want a tomato sauce (and can't find Sardines in Tomato Sauce,) then add half a small can of tomato sauce (that's 4 ounces, from an 8 ounce can) when heating up the fish in oil. If fish is canned in water, then just add the whole thing, and spoon on a couple of tablespoons of olive oil and tomato sauce.

    This is a versatile dish, so you could also saute some onion and garlic first, then add the fish. Add lightly steamed broccoli or spinach for some needed freshness to this pasta dish. You can also saute the fish with some favorite fresh herbs (or dried.) And, feel free to use any pasta you have on hand.

    Tuesday, March 6, 2012

    Vegetable Stew with Beef - Deal of the Day

    It's two for two from frozen meal purveyors Contessa. I reviewed their Shrimp and Orzo meal a year and a half ago and gave it a perfect 9, and this latest Deal of the Day is just as delicious (click here to see that earlier review.) Swanson and Banquet TV dinner makers could learn a few things from Contessa.

    First off, don't precook the veggies to mush, and secondly if you use a better quality of meat, you can still keep it cheap by serving a smaller portion -- it's okay by me if I don't stuff my face with turkey baloney and dreary mashed potatoes, masked as a Banquet Turkey Dinner (see my "Saddest Christmas Dinner" review here. ) 10 ounces is a typical frozen dinner serving size, but Contessa's frozen dinner portions are in the 6 to 7 ounce range -- small indeed, but a perfect portion for all you dieters out there.

    Beware, photo makes portions look larger than they really are!

    The vegetable stew part of this latest Deal of the Day carries nice crunchy carrots (but still cooked through) and reconizable chunks of celery and onion. Too often canned and frozen meals chop and over-cook the veggies into a mysterious hot mess. I guess the veggies pieces must be of uniform size to cook in a prescribed time frame.


    As for the meat part of this stew, it is top notch. While you may only get two or three small chunks of beef brisket, they are large enough to feel the tender texture, and savor a real beefy flavor.

    Usually the carbs come from rice, potatoes or pasta in my cheapie frozen dollar work-lunches, but this is the first time of dining on Spaetzle Dumplings. They are tasty and tender thumbnail-sized wheat-flour orbs. A nice change of pace.

    I think Contessa is wrong to call this entree a stew -- not enough liquid. It's more like a pasta sauce, and a very flavorful one, at that. Reading the ingredient list I spied Burgandy wine, tomatoes, garlic, onion and paprika. All these flavors come through nicely.


    So on a scale of 1 to 9, 9 being best, it's a forgone conclusion: Contessa Vegetable Stew with Beef gets a perfect 9 !

    For the last couple of months I've seen these frozen entrees at most of our local 99c only Stores -- so go out and get an basketful for many deliciously cheap (and light) lunchtime meals.

    Note: the product photo at the top shows 2 packages for 99.99 cents, but I usually find them for 99.99 cents per frozen package.

    Thursday, March 1, 2012

    Beef and Broccoli Stir Fry

    For this skirt steak chaser, beef is back on the menu!
    I don't think I've used it in a recipe in three blogging years. 99c only Stores used to sell frozen 3 - 5 ounce super-thin beef steaks. Now a local chain grocery, Albertsons, is stocking 3 ounce, $1 Ribeye fillets in the frozen deli case. It is just the right amount for my delicious Beef and Broccoli Stir Fry.

    One dollar is close enough to my price point for indulging in this bovine's most tender of cuts. Boy, how I like ribeye -- it's my favorite for grilling, and it has the right amount of marbling for sauteing. The only thing missing from these cheap packaged fillets is the bone for gnawing.

    Now, three ounces for a dollar...that equals just over $5 per pound. Not the best deal, but an indulgence. I prefer to cook with a small fillet, and it's even cheaper that way. You can always buy one normal sized steak and cut it up, but the temptation is too great  -- if you are like me, you will end up eating the whole friggin' thing! I bought a few filets to freeze, so keep checking back for more budget beef entrees from this loin lover.

    A cheaper way to use expensive beef is to wait until a cheaper cut is on sale. At another local chain grocery store, Ralphs, tri-tips of beef were recently priced for $2.97 per pound. It's packaged as a large 3-4 pound slab of meat -- so to get the best value, you need to break it down into single serving sizes. That way it's even cheaper than the $1 filets of ribeye steaks I found! Tri-tip is not as tender as ribeye, but it works well in a stir fry.

    Well, that's my beef about beef.


    I think you will like this quick and tasty Chinese restaurant classic. (My wife made it the other day and raved about it.) And if you want an entree low in carbs, then this recipe is for you.

    Broccoli is always on sale. It just needs a quick 5-minute steam before you add it to sauteing beef. The stir fry sauce is made of a little chopped garlic, Oyster Sauce and Soy Sauce -- pretty simple, but very flavorful.


    Ingredients for Stir Fry (1 to 2 servings)
    • 3 ounces of beef - tri-tips are a cheap cut. I got a $1 ribeye steak. Cut into bite sized strips. You can add more meat to appease your appetite.
    • 2 cups of broccoli - chop and peel some of the stem. Break broccoli into smaller florets.
    • 1/2 cup of water - to steam broccoli.

    Stir Fry Sauce
    • 3 tablespoons Oyster Sauce
    • 1 tablespoons Soy Sauce
    • 1 teaspoon garlic, chopped - fresh or from jar, optional.

    Marinade for Beef
    • 1 tablespoon Oyster Sauce
    • 1 tablespoon Soy Sauce
    • 1 tablespoon Corn Starch  - okay to substitute with flour.
    • Pepper to taste - Soy Sauce has plenty of salt.
    • 1 tablespoon cooking oil - for sauteing beef.

    Directions
    Mix marinade for beef in a small bowl. Slice beef into strips and add to marinade.


    Mix Stir Fry Sauce into another small bowl.


    While beef marinates, break and slice broccoli, with the stem, into smaller pieces. I chop off the stem and peel some of it so heat will get in and tenderize. I break and slice bigger florets into smaller sizes.


    Add 1/2 cup of water to a wok, or frying pan, and bring to a low simmer. Add broccoli and cover. (Okay to steam broccoli any way you like it.) Cook for about 3-5 minutes until broccoli is tender, but still has some crunch. When done, drain off the liquid (or, reserve to make more Stir Fry Sauce - see Hindsight below) and set aside broccoli.

    Put wok back on stove-top over a medium heat. Heat pan until damp wok is dry. Add a tablespoon of cooking oil. Swirl oil to coat bottom of the pan. Add beef and marinating liquid.


    Cook one side of the beef about 3 - 5 minutes until almost done. Turn the beef over, then pour in the Stir Fry Sauce.


    Mix well and bring to a low simmer, until it is hot. Add cooked broccoli. Mix and heat through another couple of minutes.

    Serve hot over brown or white rice, or cheap cooked (and drained) ramen noodles. It's also good on its own.


    Hindsight
    You can substitute beef with less expensive pork or chicken (white or dark meat.) Just remove pork from the bone and cut into bite-sized pieces -- for chicken you can remove from the bone, or in the case of chicken thighs or legs, just saute them whole (will take longer to cook through, add about 10 minutes more.) May need to add a little of the reserved broccoli water broth as liquid cooks out.

    If you want more sauce for the rice, just reserve a 1/4 cup of the water you used for steaming (it's now a veggie broth.) When broth cools down some, add a tablespoon of cornstarch (or flour) and whisk to dissolve -- then add a teaspoon of Soy Sauce and 2 tablespoons of Oyster Sauce. Mix well. Add this extra sauce to the Stir Fry Sauce. Follow the rest of the directions. Sauce will thicken as it heats through.

    If you are not a fan of broccoli, chunky sliced carrots (double the steaming time,) or even cauliflower, are delicious substitutions. Almost any veggie you like will do as well (spinach, asparagus, bell pepper, etc.) - alone or combined.
    Related Posts Plugin for WordPress, Blogger...