Tuesday, June 30, 2015

Texas-style Beans

When I enter the Texas border to visit my relatives, I always exit off the freeway at the first Texas BBQ joint I see. My order is always the same: smokey barbeque sliced brisket, coleslaw, beans and a big cold glass of iced tea.


Sometimes referred to as Ranch-style Beans, these pinto beans are flavored with dried chilies, tomato sauce, cumin, oregano, brown sugar and a little vinegar. That's a whole lotta flavor.

The most unusual ingredients are dried chilies. I get mine from the 99c only Store and from my local Latin market. You only need about 6 dried chilies.


Click on photo to see larger.

Packages of dried red chilies come in a variety of types: California, Ancho, New Mexico and Guajillo. The colors go from deep red to black. Ancho chili has the strongest flavor, while the others are mild. And you will just soak them in hot water for a few minutes to soften, but make sure to remove the stem and too spicy hot seeds. You will still have a little bit of heat though.


If you can't find dried chilis, it's okay to substitute with two cans of red enchilada sauce or red chili sauce. You can use whole red chiles (like chipotle) from the can - just make sure to taste any canned sauce you add, for spiciness. Another easy substitution is dried chili powder (about 4 tablespoons.)


I've been cooking with dried chilies lately. They make an intense salsa, and are the base flavor for rich Pozole, a Mexican hominy, chili and meat stew (my video recipe, here.)

All the other veggies and spices are easy to get cheaply. And pinto beans are about the least expensive legume you can find - often for way less than a dollar per pound. They take at least 3 hours of simmering to make tender, and a couple more hours for the liquid to thicken like Ranch Style Beans from a can. And they will be even tastier the next day, when you heat them up again.

For a simple instant version of canned Ranch Style Beans (if your grocery doesn't carry it,) just add a tablespoon of Chili Powder to a can of cooked pinto beans and heat it up!


I like to add a little smoked pork for extra flavor, but you can leave the meat out for a vegetarian version of Texas-style Beans. You may want to use some vegetable broth to boost the flavor.

I make these beans when I barbeque, especially my scrumptious recipe for Pulled Pork, that's a link away, here. And you may want some cold and creamy coleslaw as a contrast (recipe link, here.)  For a change of pace, add a container of Texas-style Beans to your next picnic, or serve it with any favorite Mexican meal. Type the word "Mexican" into the "Search" box, upper right side of my blog, to see all my South-of-the-border recipes.


Chilies and beans belong together. And slow cooking the beans for hours will give the kitchen a wonderful aroma. Beans freeze well, so make a big pot of my Texas-style Beans for now, and for further down the road.


Ingredients (about 6 servings)
1 pound pinto beans - rinse and remove debris, if any.
1 whole onion - white or yellow, chopped. I used a yellow onion.
1 tablespoon chopped garlic - fresh or from jar. Okay to use dried or granulated garlic.
15 ounce can tomato sauce - okay to use any canned tomato, in pieces or whole. Just break up the tomatoes in a large bowl before adding. (They will soften and form a sauce after a few hours of simmering.) 
6 dried chilis - remove stem and seeds. I used California Chilies. Okay to use any type of dried red chilies, except for the very small fiery ones. (For an easy substitution, use two 15ounce cans of red chile, enchilada sauce, or 4 tablespoons of red chili powder.) Other dried red chilies are Ancho, New Mexico and Guajillo.
1 teaspoon dried oregano
1 teaspoon cumin
1 tablespoon vinegar - white or apple cider vinegar
1 tablespoon brown sugar
Salt and pepper to taste - if you use cured pork then reduce the salt amount, as the pork is salty.
2 cups of water - to rehydrate dried chilies.
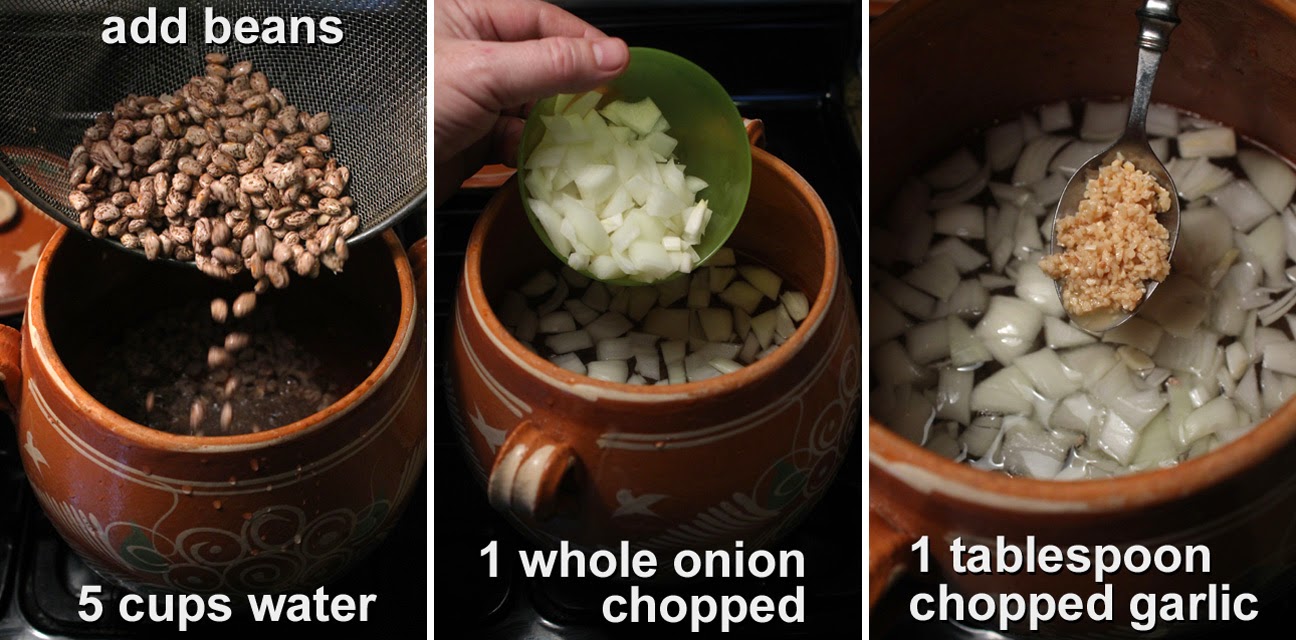
5 cups of water - for boiling the beans. Okay to substitute some of the water for any favorite stock, like: veggie, beef or chicken.
Ham hock, regular ham or bacon - optional. About half a pound of ham or ham hock. 2-3 slices of bacon. You can keep it all vegetarian and leave out the meat.

Directions
Get the dried chilies rehydrating. First remove the stems and seeds from dried chilies. Add them to 2 cups of water, and bring to a boil. Turn off heat and allow the chilies to soak for about 10 minutes to soften.


Add 5 cups of water to a large pot and turn up the heat.

Rinse the pinto beans and pick out any discolored bit of debris. Add beans to the pot of heating water. For quicker cooking you can soak the pinto bean overnight, or a couple hours.


Add one chopped onion and a tablespoon of minced garlic.


Next add the spices: ground cumin, dried oregano, brown sugar, vinegar and salt and pepper.


Dried chilies should be soft and the chili broth cool enough to blend. Add chilies to a blender or food processor, and enough chili broth to cover the soft chilies. Blend for a minute or so, until smooth. Some chili pieces will still be left, but that's okay, as they  will dissolve after a few hours of simmering with the beans.

(The lazy way to work with whole dried chilies is to remove the stem and seeds, then add them to the cooking beans. After 3 hours they will soften. Some dried chilies will break down, while others have a tough skin that will not soften. In that case just fish out the pieces of tough chilies when the beans are ready to serve. This easy whole chile cooking method is fine because you still get all of the chile flavor.)

Add chili sauce to pot with beans. Pour in a can of tomato sauce. If using whole tomatoes then break them into smaller pieces.


Stir all the ingredients together in the pot to mix well. Finally add a ham hock, ham piece or some bacon. If you are using bacon then crisp it up in a pan first, to remove some of the fat. Of course, you can leave out the meat and make these beans vegetarian. Some veggie broth would be a good addition (optional.)


Now bring it all to a boil, then reduce heat to a low simmer and cover the pot. Cook about 3 hours. Check beans every half hour to stir, so beans don't stick to bottom of pot and burn.


Uncover the pot and cook another hour or two. This will reduce the liquid. After about 3-4 hours total you can check to make sure the Texas-style Beans are tender, before serving.


Hindsight
If you want a thick, gravy bean broth then slow simmer for about 6 hours. Texas-style Beans served in a BBQ joint have been slow cooking all day. If the liquid cooks down too much then add a little water, as needed. Stir occasionally so beans do not stick to bottom of pot.

If you don't have access to whole dried chilies or enchilada sauce, an easy substitution is 4 tablespoons of chili powder from a spice jar.

For more chili flavor add a couple more dried chilies, or add a tablespoon of chili powder or paprika. Just taste the broth after a few hours to see if it needs more chili spice flavor.

For a simple instant version of canned Ranch Style Beans (if your grocery doesn't carry it,) just add a tablespoon of Chili Powder to a can of cooked pinto beans and heat it up!

Tuesday, June 23, 2015

Wife Approved Recipes

Come and get it! My number one taste tester tells me when she likes something I've cooked. Fried Pig Skin does not make the cut, neither does an Alligator Po'Boy. Her preferences tend to be lighter fare, but since she's lived in the South (like me) in her salad days, she enjoys my forays into BBQ like a Pulled Pork Recipe.

To see a list of her likes, just scroll down into my food blog and look for this photo of her with the heading "Wife Approved Recipes". You can click on any recipe listed below her photo, until you get to the new heading of "VIDEOS - Recipes".

Some of her favorites are vegetarian, like: Whole Steamed Artichoke, a Mexican vegetable soup called Calabasitas, and a decadent dessert of Mini-Pecan Pies made by her mother-in-law.


Since we live in Los Angeles, many Wife Approved Recipes are things we've shared at local restaurants, and that I've later tried to replicate at home. When we were first going out, our go-to neighborhood choice on date night was Mexico City Restaurant in Los Feliz.

Amy always ordered the Fish Veracruz, a yummy tender fish fillet smothered in a fragrant oregano, garlic, and tomato sauce with pungent green olives. Click here to see that recipe.

I ordered the Pollo en Mente or Mint Chicken (which is Wife Approved.) You can read about one of our nights out at Mexico City Restaurant by clicking here. And Mexico City Restaurant is still around serving their tasty take on Latin cuisine.

Often I've hungrily peered into the refrigerator to see what she's eating. Sometimes I've raided her purchase of a prepared salad from Trader Joe's, our local cheaper version of Whole Foods Market. One of her favorites is a Trader Joe's chilled salad called: Curried White Chicken Deli Salad. I liked it so much that I came up with my own cheapie version (using dark meat instead of more expensive white meat,) just a click away here.


When you live with someone, you can't help being influenced by their eating habits. Look no further than my list of Wife Approved Recipes for all the deliciousness our life together has shown me.

Wednesday, June 17, 2015

Bacon Wrapped Brussels Sprouts - Video Recipe

I know, it's cheating, wrapping veggies in bacon - too easy. But, this kind of cheating has never been so right! My latest recipe video, Bacon-Wrapped Brussels Sprouts, is a perfect party appetizer.


Decadent as all get out, just put out a platter of these delectable nuggets and watch them disappear in a flash, so be sure to squirrel away a couple for yourself.

These bacon-wrapped veggie orbs are lozenges for the soul - a  smokey, salty, sweet, and savory bite. A roasted Brussels sprout is the ideal size for an appetizer.


The 10-ounce package, I bought at my local 99c only Store, held a bunch of various sizes, from about 3/4 of an inch to 2 1/2 inches tall.


So, it's best to look the package over and pick one that holds Brussels sprouts with more uniform proportions.

Bacon is not cheap anymore. I can get a package, again at the 99c only Store for $1.99, but for this recipe, I'm only using half a package, so it's still within my self-imposed price point.


However, I've also found $1 packages of extra lean Jennie-O turkey bacon at my local Dollar Tree, now that's more like it.


While turkey bacon has low calories going for it, the texture and crispness are different. Turkey bacon crisps evenly, but, I miss the way bacon has strips of meat and fat. This brand of turkey bacon, right out of the package, has the texture of baloney. When fried or baked, it has the familiar bacon flavor. So it's not a bad substitution for the real thing.

 Turkey Bacon

Depending on the size of each Brussels sprout, I used half a slice of bacon per sprout. Ideally, you want to wrap each Brussels sprout one and a half times. If the bacon slice is too small, it will shrink too much and work its way off the sprout (but, since you serve this appetizer with toothpicks, just reattach any bacon that shrinks off the sprout.)


Of course, if the sprouts are large, and your guests are bacon lovers, then wrap them with a whole slice of bacon.

Roast these appetizers for about half an hour, until the bacon is crisp and Brussels sprouts tender. I used a roasting pan with a wire rack, so the excess grease drained off, and the bacon browned evenly. Of course, use what you've got. If it's a flat roasting surface then rotate the Bacon -Wrapped Brussels Sprouts halfway through baking, for even browning.


Porcine-wrapped mini-cabbages are a tasty way to start any party, or just please yourself and make a snack of my Bacon-Wrapped Brussels Sprouts.

Bacon-Wrapped Brussels Sprouts  - VIDEO

 Play it here, video runs 2 minutes, 14 seconds.

My YouTube video link for viewing or embedding, just click here.

Ingredients
  • 10-ounce package of Brussels sprouts (about 20 pieces) - amounts and sizes will vary in each package. Try to find a package with uniform sizes. Okay to halve the largest sprouts once they reach 2 inches tall. Okay to use as much Brussels sprouts as you like - just increase the amount of bacon to use.
  • 1 package of sliced bacon - okay to use low-calorie (and sometimes cheaper) turkey bacon.


Directions
Prep the Brussels sprouts by giving them a quick rinse, if necessary. Make a thin slice and remove the roots/stems. Remove any yellow or wilted leaves.


If the sprouts are really large, over 2 inches tall, then slice them in half. (Of course, you can roast them whole, just increase the baking time by 10 or 15 minutes, watching closely so that the bacon doesn't burn.) Set aside Brussels sprouts to drain and dry.


For this recipe, I used half a slice of bacon. What you want is for each Brussels sprout to be wrapped, at least, one and a half times with bacon. If you are feeling indulgent, then use a whole slice of bacon on the largest Brussels sprouts.


Place each Bacon-Wrapped Brussels Sprout with the bacon seam side down. The weight of the Brussels sprout will help keep the bacon from peeling off the sprout during baking.


My roasting pan has a wire rack, so the grease drains, and each appetizer browns evenly. For a roasting pan without a wire rack, be sure to rotate the Bacon-Wrapped Brussels Sprouts halfway through cooking, so the bacon roasts evenly.


Add Bacon-Wrapped Brussels Sprouts to a roasting pan - in a 350-degree oven. Roast for about 30-45 minutes, depending on how large the Brussels spouts.


When done, pierce the largest Brussels sprout with a toothpick, it should go in easily. Or, reward yourself and try one to check for doneness.


Allow the Bacon-Wrapped Brussels Sprouts to cool for a minute before serving - they will be very hot right out of the oven. If bacon separates from any of the sprouts, then reattach with a toothpick. For a party, go ahead and serve Bacon-Wrapped Brussels Sprouts speared on toothpicks.

Thursday, June 11, 2015

Teriyaki Chicken - Deal of the Day

The Great Wall of China should surround my latest Deal of the Day. And the reason why? To keep any sucker from trying Yu Sing Asian Style Cuisine's Teriyaki Chicken.


My latest sad excuse for a Deal of the Day has the two worse aspects of frozen fare: over-cooked veggies and mystery meat.


First, the veggies are steamed to blandness. I detected a few stands of carrot, and the broccoli was overcooked and  tasteless. I didn't think they could find such tiny, fingernail-sized, pieces of broccoli. (In this case that's a good thing, as I usually complain on the portion size when veggies are included.)


Pineapple is of the canned type and  mushy. It's the only ingredient that stands out, but just barely.


The teriyaki sauce was not too sweet, and the rice is okay - those are the only two good things to mention about this sad Deal of the Day. The rice grains are not glued together, like some defrosted fare.


Chicken is from a processed loaf. Is it white meat or dark meat? I couldn't figure it out. It's just like biting into a chicken-flavored makeup sponge wedge.


I can see why this cheap$kate frozen meal castoff finally ended up in a Dollar Tree - too bad they are extending the shelf life.

Well, I think you can can guess my Deal of the Day rating of Yu Sing Asian Style Cuisine's Teriyaki Chicken, from 1 to 9, 9 being best. This frozen entree gets a generous 2. Mainly for the rice and teriyaki sauce.

If President Nixon during his China trip had brought any of this back, he would have been forced to resign even earlier. So, I recommend a food blockade of  Yu Sing Asian Style Cuisine's Teriyaki Chicken!

Friday, June 5, 2015

Fresh Fruit Salad

Cherries are on sale at my local  Latin market for 99 cents per pound! And, they provid the bulk of sweet and tangy produce as well - just read below all the Spanish words of the abundant frutas on sale.

So, now the time is right for my refreshing Fruit Salad. Of course, any seasonal fruit on sale can go into your own citrus salad. I like to mix up crunchy fruit with the soft and juicy.


My fruit salad is minimalist, just whatever fruit I can find on sale. And I give it a generous squeeze of lemon, or lime, to prolong it's freshness, and to cut the sweetness with a little sour.


I always find bananas priced way below a dollar per pound. If you are making a Fruit Salad ahead of time, then don't add sliced banana until you are ready to serve, they turn brown too quickly, even with a lemon or lime bath.


Apples and oranges frequently come on sale. Apples are easy to slice and dice. Oranges can be a little messy, with a slight bitter pith, that separates the skin from flesh. I like to slice off the peel and pith. You could then slice into each orange wedge to cleanly remove the flesh. I don't go that far.


Cherries take the most work, but are worth the trouble. I slice each cherry around the center seed. Twist the cherry halves and expose the seed. Now, it's easier to pluck the seed out. Have a paper towel handy in case juice gets everywhere!


To bulk up a Fruit Salad, add sliced melon or watermelon. If you are from the South, them add some fresh peaches, nectarines, blackberries and strawberries. Northerners get to add some blueberries and all kinds of apple varieties. If you live in breathtaking Hawai'i, add passion fruit, mango,pineapple, lychee nut, papaya and  slivers of fresh coconut.


Whatever the season, keep an eye out for fresh fruit on sale at your local farmers market or roadside fruit stands, then assemble a cheap$kate Fresh Fruit Salad- your way.


Ingredients (2 servings)
  • 1 banana
  • 12-20 cherries
  • 1 apple
  • 1 orange
  • 1 tablespoon lemon or lime juice - can add more or less to your taste.
  • More fruit to add: peach, strawberries, blueberries, blackberries, mango, papaya, pineapple, nectarine, plum, melon, watermelon and grapes.

Directions
For apples, just remove the apple core and stem, then chop.


Cherries are sliced all around the center. You then twist the opposite ends of cherry to expose the seed. Now just pry it out with a knife, small spoon or use your fingers.


I slice an orange in half. Then, slice off the skin and pith to expose the orange flesh. Now just slice of the orange into bite-sizes. Remove any seeds if necessary.


For a banana, peel and slice, but only do it just before serving your Fruit Salad. Bananas do not keep long once the peel is off.


Finally, give the fruit a squeeze of lime or lemon juice. I add about a tablespoon. You can add more or less to suit you own taste.

Related Posts Plugin for WordPress, Blogger...