Thursday, August 24, 2017

Grilled Sweet Potato - Video Recipe

I usually bake Sweet Potatoes, but during the sweltering days of summer, it's cooler to do it outside on the BBQ grill.


So let's get cooking with The 99 Cent Chef. My summertime stop-motion video features Grilled Sweet Potato.

This Frugal Forager gets them from the local Latin grocery store. I picked up a couple of bright orange/red ones, as they are the sweetest. You can use my recipe with tan-hued yams or regular potatoes. Sometimes grocery stores call the orange/red tubers yams (at least here in the U.S.) You can read about the difference between a yam and a sweet potato by clicking on the names. I just go by color these days, bright orange/red equals sweet.


I cook this tuber simply, just rub or brush on some olive oil and season with salt and pepper, then grill them for about 3 minutes on each side.


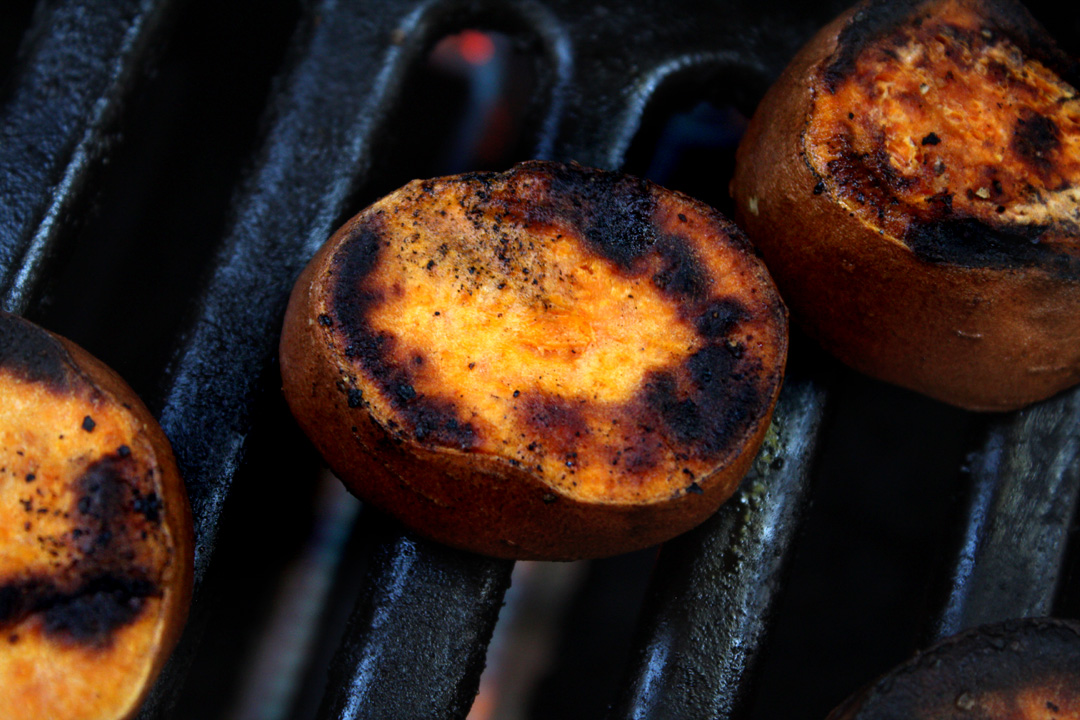
I have a cheap gas grill, so it's easy to keep track of how long it takes. If you have a charcoal or wood-burning grill the cooking time will vary according to how intense the fire is, and you will have to watch things closely. What you are looking for is a slight char or burn. When the Sweet Potato is soft to the touch then it is done.

I slice the tubers thickly, about a half inch. I also leave the skin on. It's up to you how you like to prepare them.


The Grilled Sweet Potato will continue to steam and soften after removal from the fire. And you can easily peel off the most blackened skin parts if you like. Me, I like some of that charred flavor.

You can adapt this recipe for indoor cooking too. I like broiling them in the oven. Just check on them every minute or so. Some of the smokiness is lost, but the sweetness and char flavors still come through. You could even roast the Sweet Potato in the oven, especially if you are baking a chicken; it takes about 30 minutes of baking, so add the slices a little over halfway through baking.

And be sure to cook plenty. Grilled Sweet Potato makes a low-calorie side dish and can be easily reheated anytime. Pull the Grilled Sweet Potato slices out of storage from the refrigerator and zap them in the microwave for a minute or so.


When I'm grilling protein, Sweet Potatoes are a lighter contrast to typical heavy sides like potato salad or french fries.

In my stop motion recipe video, I go overboard with the olive oil, but that's just for show -- you can lightly brush on a minimal amount or use your favorite oil spray.

My Grilled Sweet Potato recipe works with almost any other crisp veggie like corn, cauliflower, broccoli, carrots, yellow neck squash, onions, and asparagus. Cooking time will vary depending on the size and thickness of the veggies.

If you've never put vegetables alongside that barbequing burger, hot dog, or chicken leg, now is the time to start. And you can't do better or easier than Grilled Sweet Potato.

Grilled Sweet Potato- VIDEO

Play it here, video runs 1 minute, 19 seconds.

My YouTube video link for viewing or embedding, just click here.

Ingredients (about 2 servings)
  • 1 large Sweet Potato - about 1/2 thick slices
  • 1 to 2 tablespoons Oil - I used olive oil, but okay to use any favorite oil.
  • Salt and Pepper to taste - Okay to use any favorite seasoned salt.


Directions
Get your barbecue grill going. Okay to do this recipe indoors in a broiler oven.

Scrub and clean sweet potato if necessary. Slice sweet potato into thick slices, about a 1/2 each slice. I left the potato skin on, but you can peel potatoes if you like.


Drizzle on oil. Salt and pepper sweet potato slices.


When the grill is hot add sweet potato slices. Since sweet potato has a high sugar content, they may burn some. That's okay since it's easy to scrape off some of the burnt bits. Hey, char is part of the barbecue taste.

Your cooking time will vary depending on the grill heat. I used a gas grill and it took about 3 minutes for each side of sweet potato to cook through.


You want the sweet potato to be soft on the inside when done. I noticed that even if the middle is slightly hard, the sweet potato will continue to cook and tenderize, even when removed from the fire. So don't worry if all the cooked slices are not uniform in doneness, they will continue to cook as you set the table or grill other things.


You can cook sweet potatoes ahead of time and reheat them in the microwave or an oven.

This recipe will work with any potatoes you like, including red, white, russet, and yam.

Wednesday, August 16, 2017

Corned Beef Hash - Deal of the Day

I am a fan of Corned Beef Hash and my latest Deal of the Day is quite tasty, even from a can. What makes it a hash is the addition of cooked diced potatoes. There are a lot of purveyers of canned Corned Beef Hash out there, and as for this one, American Pride, it does the job fine.

The can instructions says this Hash is already cooked and ready to eat - well, I would give it a seared caramelized crust first, then serve. It's too much like a greasy and meaty potato salad texture, kinda off-putting to me, in it's raw state.  

Corned Beef is cured with sugar, salt and coriander spice, so that is a lot of flavor. You can see my recipe here, to make your own Corned Beef, or Pastrami, sometime.


I like my Corned Beef Hash with over-easy eggs for breakfast. I cook the Hash about 5 minutes until it has a crispy crust on one side, then I get the eggs going. It is best to use a non-stick pan so it's easier to turn over crispy Corned Beef Hash. But if you use a regular frying pan, be sure it's well oiled.


As with typical Corned Beef, this version is salty, but not too much to overpower everything, so you don't need to salt the eggs, too. I just add a little pepper to my eggs.

And when the eggs are done, the best part is breaking the yolk and swirling it into the hot Corned Beef Hash. Next cut out a hunk of egg white and scoop it up with a chunk of Hash. Boy is this a tasty mouthful.


I'm sure this Corned Beef Hash would combine with scrambled eggs, too.

I used about a third of this 15 ounce can for one serving. This may seem like a large amount, but once the Hash is heated, it starts to reduce in size, melting out the water and any beef fat.

right from the can

Now there are a couple of minor problems that the can cover photo doesn't show. First, it looks like there are large pieces of  corned beef  brisket. The salty and pungent corned beef taste is there in spades, but the meat texture is more ground meat than typical chunky beef. So the potato and meat mush together in flavor.

The potato part is okay though, while the cubes are on the small side, they are big enough to sometimes have a nice plain potato starch taste.


The ingredient list short, mostly corned beef, potatoes, sugar and a little more salt. You don't want to serve this every day as there is a lot of fat and sodium.


My latest Deal of the Day is a pungent way to start the day. I would give this Hash another try, too. So on my Cheap$kate Dining Scale of 1 to 9, 9 being beast, I give American Pride Corned Beef Hash a satisfying 6!


Wednesday, August 9, 2017

Mexican-style Pinto Beans - Video Recipe

I grew up eating Pinto Beans. We had them added to breakfast, lunch, and dinner. After you watch my latest video recipe you'll see how easy it is to do for yourself - and you don't have to have them for every meal like I did.


My latest cheap$kate homemade recipe is a long time coming. I cook with Pinto Beans more than any other legume, everything from chile-flavored Texas-style Beans to creamy Refried Beans. I enjoy making Mexican entrees often and Mexican-style Pinto Beans show up every time.

And I'm not too proud to use Pinto Beans from the can - they are cheap enough, taste fine, and are so convenient - the same way I always keep a couple cans of tomato sauce for pasta at the ready.


There's nothing better than the fragrance of slow-cooking beans on the stovetop. Like Marcel Proust's madeleine cookie, whose taste stimulates the unfolding of his series of novels "Remembrance of Things Past," the simmering smell of a pot of Pinto Beans soothes my soul with homey thoughts.

Dried pinto beans are tan, with leopard-like spots, which fade to deep brown when cooked for hours.


My mother comes from a small fishing village on the Gulf Coast of Texas, and we lived there with her parents, Big Daddy and Big Mama, for a year or so. Big Mama always had a pot of beans going. These legumes showed up for breakfast as Scrambled Eggs with Refried Beans; for lunch, it could be freshly made flour torilllas that we made into Ground Beef Tacos with Beans and Rice; and for dinner Mexican Rice with Shrimp served with Pinto Beans.

So you see how Mexican-style Pinto Beans can be paired with almost any Latin entree, and as a BBQ side dish with cool coleslaw or potato salad.

Pinto Beans are inexpensive at almost any grocery store, especially in Latin markets. This recipe is perfect for my fellow cult cheap$kate followers.


And it's a short and easy-to-get ingredients list, so you can make your own pot of beans no matter where you live. Dried Pinto Beans are carried everywhere. You can use fresh chopped onion and garlic - but there is nothing wrong with using shortcuts like dried onion flakes and garlic powder.

The spices are dried oregano, cumin, and a bay leaf - finishing up with salt and pepper.

My Mexican-style Pinto Bean recipe is tasty without meat. But if you are so inclined, then add smoky pork flavor with a few slices of bacon, some chopped ham chunks, or a ham hock.

It does take about 4 hours to tenderize pinto beans, so, you may want a book or magazine handy to help fill the time.


Some like their beans with a bit of texture, while others like them very tender. You know your friends and family, so it's up to you to decide how long to cook beans. Soak the beans overnight and cut down on the cooking time by an hour or so.

Once the beans are tender, it's a simple step to make Refried Beans, too. All you do is add a couple of cups of tender beans to a heating frying pan that has a tablespoon of oil. Next, pour in a few tablespoons of the bean broth. What you want is enough liquid to mix with mashed beans until the desired creaminess is reached. If you add too much liquid, then add more beans.


So while a big pot of Pinto Beans is on the stove, filling the kitchen with its fragrance, you can click on any of my following recipes that feature this filling and flavorful south-of-the-border legume: Scrambled Eggs and Refried Beans, Huevos Rancheros, Breakfast Burrito, Carnitas, Ground Chicken Tacos, Carne Asada, Mexican RiceChicken Tinga Stew, Charro Beans and a Frybread Taco.

Mexican-style Pinto Beans - VIDEO

Play it here, video runs 2 minutes.

My YouTube video link for viewing or embedding, just click here.

Ingredients
  • 1 pound dried pinto beans - rinse and remove any debris, if necessary
  • 1 onion - chopped. Yellow or white onion.
  • 1 tablespoon garlic - chopped fresh or from the jar.
  • 1 teaspoon dried oregano
  • 1 teaspoon ground cumin
  • 1 bay leaf
  • 1 tablespoon oil
  • Salt and pepper to taste
  • 9 cups of water - For extra vegetarian flavor, add a cup or two of veggie broth (be sure to reduce water an equal amount.)
*For extra flavor add a slice or two of bacon. You can also add any of the following: a ham hock, ham bone, or chunks of ham.


Directions
If you like bacon in your beans then start sauteing a couple of slices in a large pot.

For vegetarian Pinto Beans go right to adding a tablespoon of oil to a large pot with a cover.

Click on any photo to see larger.

Add one chopped onion and saute for 5 minutes until tender. Add chopped garlic and saute for another minute.

Sprinkle on ground cumin, dried oregano, and salt and pepper to taste. Recipes call for Mexican oregano, but you can use any type, really.


Now time to add the beans. Rinse and remove any debris from dried pinto beans, if necessary. Cook beans in any large pot. I have a clay one that is especially used for cooking beans.

Add pinto beans to a large pot with 9 cups of water. Add one bay leaf.


*You can soak beans overnight or for a few hours first. I usually just go right to getting the water to come to a boil, without soaking them. It's up to you, soaking will speed up the cooking time, and you will save about an hour of simmering.

If you add veggie broth be sure to reduce the water amount.

Bring the pot of beans to a boil. Reduce heat to a low simmer and cover the pot of beans.

Cook covered until beans are tender, anywhere from 3-5 hours. You can start tasting them after a few hours to check for tenderness. Stir occasionally, so beans don't burn or stick to the bottom of the pot.


And check beans from time to time to make sure the liquid doesn't cook out. Add water as needed. What you want is for some of the water to cook out, so you get a thick soup of broth with the beans.

As with any type of slow cooking, make sure to stir from time to time. Sometimes the beans will stick to the bottom of the pot, so scrape and stir before they burn.


To thicken bean broth, uncover and continue cooking the last half hour or so. You can also mash some of the beans to thicken the sauce.

Pinto beans can cook all day at a low temperature. This recipe works fine for a crock pot.

Hindsight
Soak beans in water overnight to cut down on cooking time by an hour or so.

The beans will taste even better the next day. Pinto Beans freeze well, so make plenty for later.

It's easy to make Refried Beans. Just add some cooked whole pinto beans to a frying pan with a little oil. Mash the beans with a fork or potato masher until mushy. Just stir and cook the beans until hot. You can add bean broth to make the Refried Beans texture as thick or thin as you like.


Wednesday, August 2, 2017

Fresh Boiled Corn - Video Recipe

Summer corn is in season and my easy Fresh Boiled Corn video recipe is here just in time for you to try.


The only prep is cleaning the Fresh Corn and that is easy enough, although a little messy with all the silk threads under the Corn husks.


I break off any long stalk parts that are left on. You can boil the Corn whole. I like to break it in half if the Corn is very large.

Fresh Corn is often on sale at my local Latin and regular grocery stores, and you can always pick up a few ears cheaply at your local farmers market or roadside veggie/fruit stand.


Once the Fresh Corn is boiled tender you can add it to your barbecue grill, right beside that steak or hamburger. Turn the Corn a few times to get a little char all around.


When the Fresh Corn is done, and cool enough to handle, slice off the kernels and use them for a few more of my cheap$kate recipes like Roasted Cream Corn, Sweet Corn Pudding, Corn and Tomato Salad, Black Bean and Corn Salad, and Calabasitas Mexican Stew; plus add some fresh cooked corn to Fake Crab Ceviche and Clam Chowder.

I spent my high school years in Louisiana and dug into many backyard Crawfish Boil that features crayfish, corn cobs, and red potatoes boiled in a heady mix of spices that make up a typical spicy seafood boil.


After removing hot Fresh Boiled Corn from the pot, I simply add butter or a fave substitute, and season with salt and pepper. If you have a favorite seasoned salt then use that. You can keep it vegan with a fave butter substitute, or drizzle on a flavorful oil. 

Now is the time to cook with Corn while it is in peak season and cheapest - just the way I like it!
Fresh Boiled Corn - Video Review
Play it here. Video runs 1 minute, 37 seconds.

My YouTube video link for viewing or embedding, just click here.

Ingredients (2 servings)
  • 2 Ears of Fresh Corn - I halved the ears of corn. Okay to add more corn to your pot of water. It will take about the same time to cook, whether it's 2 ears or 4.
  • Water - enough to cover the shucked corn.
  • Salt and Pepper to taste - when serving boiled corn.
  • Butter - or butter substitute when serving boiled corn.


      Directions
      Over high heat, add enough water to a pot to cover cleaned corn. 

      As water comes to a boil clean the corn cobs. Remove the silk and husks that cover the corn. Silk are thin soft threads. They will take the longest to remove - a quick rinse of water in the sink will help take off the smallest strands of silk and boiling will get rid of any that's left.


      You can break off any longer stem. Sometimes it's hard to remove, so it's okay to just leave it on. I like to half my corn cobs if my pot is small. Also, kids may enjoy corn that is smaller and halved.

      Add cleaned corn to water. Bring to a boil, then reduce heat to a low boil or simmer. Cover pot and cook corn until it is tender about 10 minutes.


      Some like their corn cooked less and others like it cooked longer - it's up to you.

      When done, allow corn to cool for a minute before serving as it's very hot. Be careful handling hot corn. 

      I just like salt, pepper, and butter on my hot Boiled Corn. If you have a favorite seasoned salt then use that. Okay to leave out pepper. 


      Hindsight
      During barbecue season I throw a couple of Boiled Corn cobs on the grill when I cook a steak or hamburger. Depending on the hotness of your grill it takes about as long to cook a steak as grilling Boiled Corn.

      Turn the corn when one side is slightly charred. You can char the corn as much as you like. Grilled Corn will dry out some.

      Related Posts Plugin for WordPress, Blogger...